My student Nicole recently hosted a excellent workshop on how to use HPC interactively at UArk. Please refer to her website here.
General Information
Arkansas High Performance Computing Center (AHPCC, official website) is available for research and instructional use to faculty and students of any Arkansas university and their research collaborators. There is no charge for use of our computing resources.
To use the HPC, an AHPCC account must be requested through Internal Account Request Form. Please see here for more information about AHPPC inventory.
1 Connect to HPC
You can use online dashboard or terminal to have access to AHPCC nodes.
1.1 For terminal
As long as you have an AHPCC account, you can connect to HPC through SSH. For Windows users, you can use PuTTY or Powershell to connect to HPC. For Mac and Linux users, you can use the terminal to connect to HPC. The command is:
ssh[username]@hpc-portal2.hpc.uark.edu
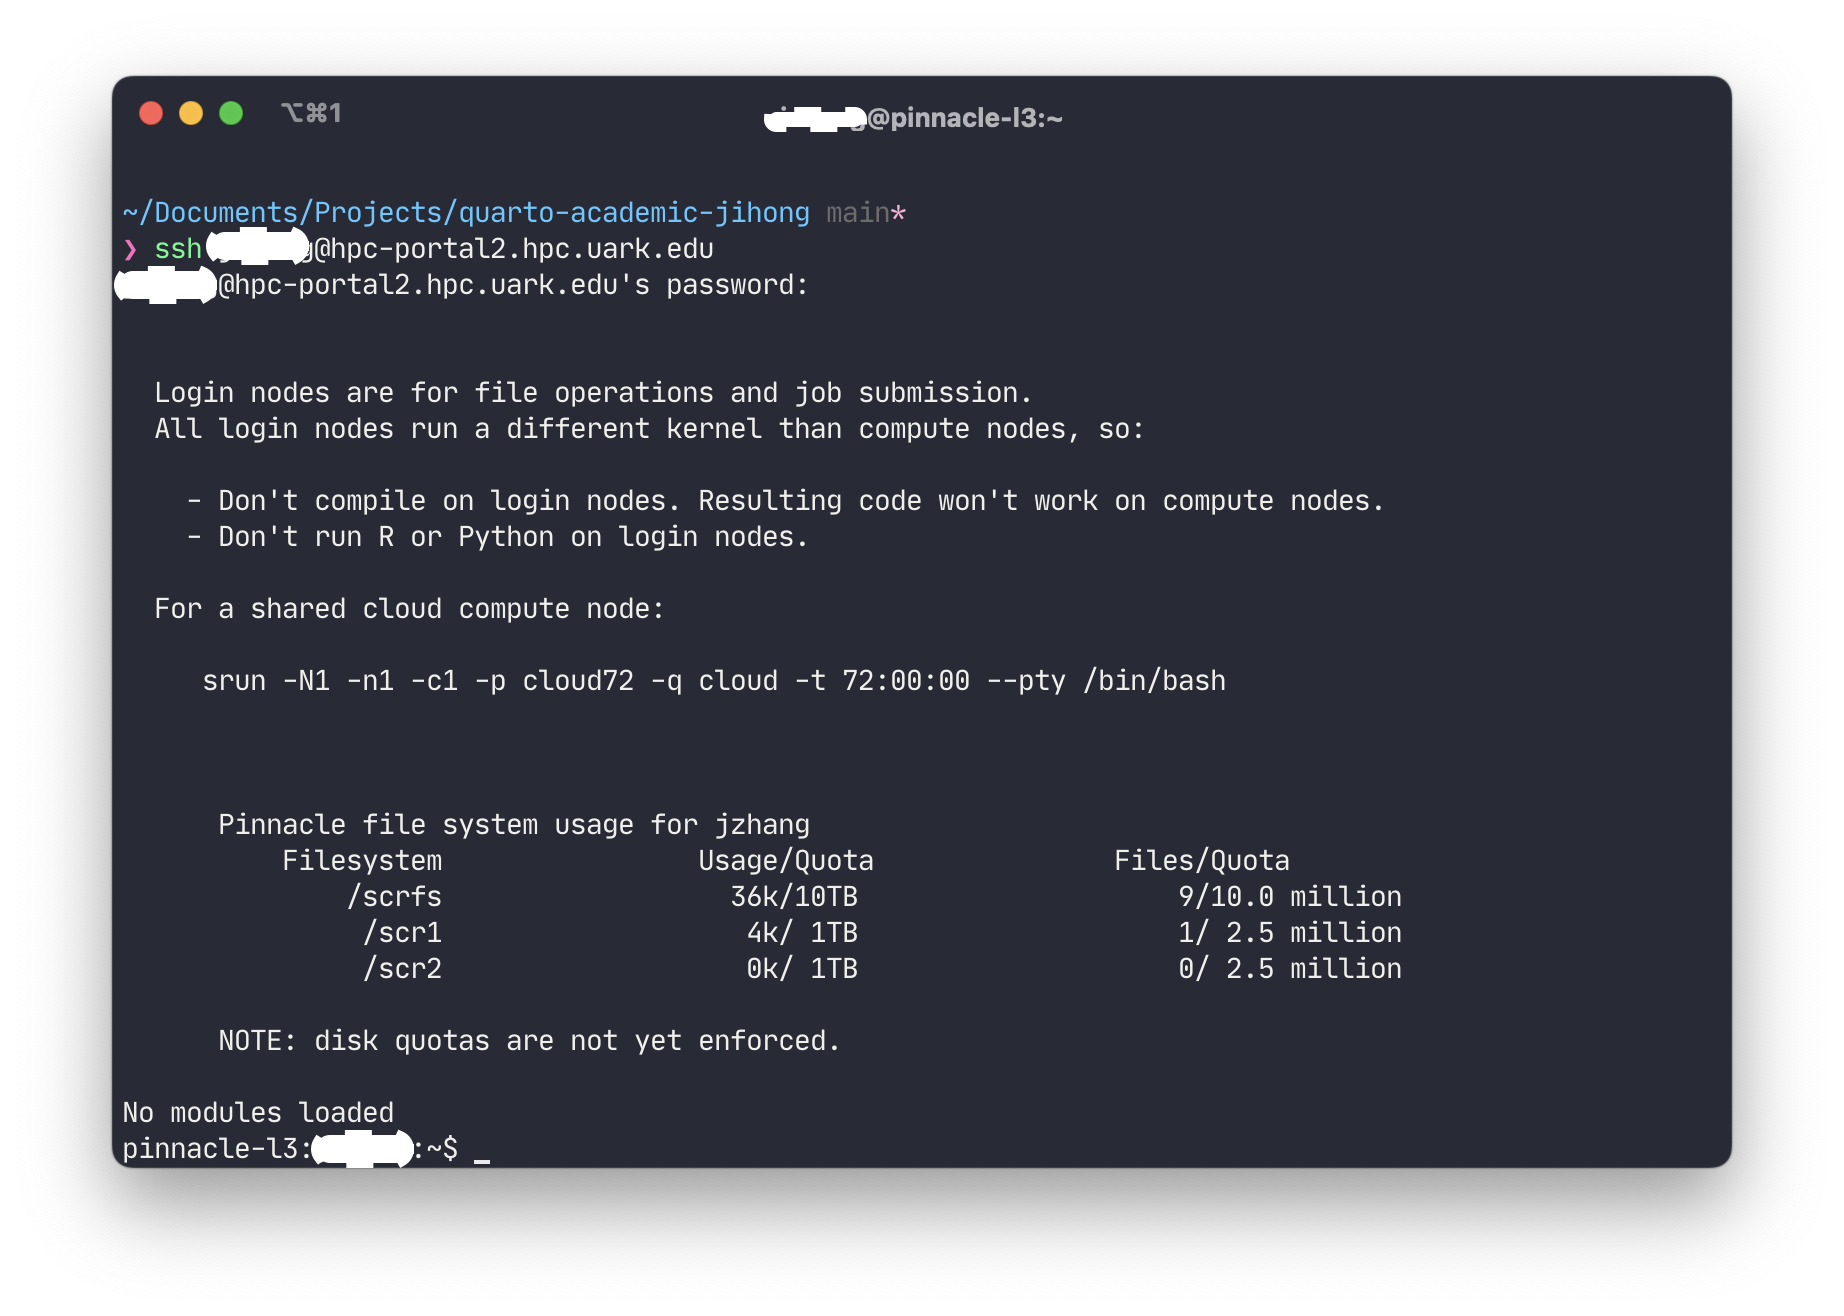
Replace [username] with your username of AHPCC account. Passwords will be required. After you enter your password, you will be connected to HPC and your terminal/Powershell will look like this.
Login Screenshot
Note: Pinnacle is a new resource at the University of Arkansas in 2019. It consists of 100 Intel based nodes with 20 NVIDIA V100 GPU nodes enabling data science and machine learning and 8 big memory nodes with 768 Gb ram/each for projects requiring a large memory footprint.
1.2 SSH login without password
Generate a pair of authentication keys in your local machine and do not enter a passphrase using the following codes:
ssh-keygen-t rsa
Please note that make the passphrase empty:
Generating public/private rsa key pair.
Enter file in which to save the key (/Users/[username]/.ssh/id_rsa):
Enter passphrase (empty for no passphrase):
Enter same passphrase again:
Your identification has been saved in /Users/[username]/.ssh/id_rsa
Your public key has been saved in /Users/[username]/.ssh/id_rsa.pub
In your local machine, type in following commands to copy local public key to the hpc server.
For slurm, please use the commands in the 1st column. Then you should be able to start R in an interactive job and install required packages. If you load R/4.2.2 module, those packages installed via an interactive job will be stored at $HOME$/R/x86_64-pc-linux-gnu/4.2/. See here for more details about interactive job.
4 Jobs submission
4.1 Workflow
There are multiple steps to submit the R file to cluster to run.
Before we submit the job file, we need to determine the computing nodes we want to use. Please refer to this link for detailed information about HPC equipment. A general ‘job submit’ command is like this:
The sbatch command (a slurm command) aims to submit a job that is saved to the job file example.sh or example.slurm. The command above submitted the job to the q06h32c queue with a wall-time of 1 minute requesting all 32 cores on 1 node.
Then, we need to create a job file with .sh or .slurm extension to automatically run the job submission commands on the HPC.
Here’s a simple example of a job file example.sh that can tell HPC how to run your R code (#SBATCH represents all parameters we feed to job submission):
NoteClick to Learn Which Modules Needed for R Language
Where Line 8 loaded all required modules:
gcc and mkl are required for R package installation (Note: To the date, gcc/11.2.1 is the latest version of gcc than can compile the cmdstanr successfully). Please see here for more details.
Rscript is the bash command to execute R file on HPC. HelloWorld/example.R is the path of your R script.
Anything behind the #SBATCH are options for the SLURM scheduler. Please see following summary or view it online.
Last but not least, we may want to use R interactively to test your R code is running well. Use the following bash command to start a new R session in terminal:
For R programming, if we want to submit multiple jobs iterating over data files (each job runs a data analysis using one data file). Then, one easiest way is to create a masterJob.R file that can
create multiple bash job submission file with filenames containing their job ID (.sh or .slurm)
submit those job files iteratively using for loop and sbatch.
Following is one example of how to submit and run multiple data analysis jobs on HPC using 162th to 240th data files. Note that #SBATCH --output=/home/jzhang/BSEM/OutputFiles/himem72-%j.out redirect output files (.out) to the user-specified directory (which is BSEM/OutputFiles in this case). %j will append Job ID to the filenames of output files.
masterjob.R
library(tidyverse)root_path ="/home/jzhang/"for (i in162:240) { jobfile <-paste0("Analysis_ModelA_DivergentSV", i, ".sh") # change file for specific model## --ntasks-per-node=6 : there are 6 R files to be running parallels.## --cpus-per-task=3: for each R files, there are 3 chains initial <-"#!/bin/bash#SBATCH --job-name=himem72#SBATCH --output=/home/jzhang/BSEM/OutputFiles/himem72-%j.out#SBATCH --partition himem72#SBATCH --nodes=1#SBATCH --ntasks-per-node=1 # adjust this if you want to use multiple threads#SBATCH --cpus-per-task=3 # adjust this if you are using parallel commands#SBATCH --time=72:00:00 # adjust this if you want to request more running time#SBATCH --mem=1000 # adjust this according to the memory requirement per node you need#SBATCH --mail-user=YOUR-EMAIL # adjust this to match your email address#SBATCH --mail-type=ALLsource /etc/profile.d/modules.shmodule purgemodule load intel/21.2.0 mkl/21.3.0 R/4.2.2 gcc/11.2.1cd $SLURM_SUBMIT_DIR "## adding all R files simultaneously jobfile_content <-paste0(initial,paste0("\nRscript ", root_path,"BSEM/Rcode/Analysis_ModelA_DivergentSV.R "), i, " '" , root_path, "'")write_lines(jobfile_content, file =paste0(root_path, "BSEM/JobFiles/", jobfile))# message(commd)system(paste0("sbatch ", paste0(root_path, "BSEM/JobFiles/", jobfile)))}
Alternatively, you can use array jobs for similar jobs submission. See more details in slurm wiki.
# Submit a job array with index values between 0 and 31$ sbatch --array=0-31 -N1 tmp# Submit a job array with index values of 1, 3, 5 and 7$ sbatch --array=1,3,5,7 -N1 tmp# Submit a job array with index values between 1 and 7# with a step size of 2 (i.e. 1, 3, 5 and 7)$ sbatch --array=1-7:2 -N1 tmp
Job arrays will have additional environment variables set.
SLURM_ARRAY_JOB_ID will be set to the first job ID of the array.
SLURM_ARRAY_TASK_ID will be set to the job array index value.
SLURM_ARRAY_TASK_COUNT will be set to the number of tasks in the job array.
SLURM_ARRAY_TASK_MAX will be set to the highest job array index value.
SLURM_ARRAY_TASK_MIN will be set to the lowest job array index value.
5 Cancel job
Use scancle [jobID] to cancel one running job or scancle jobID1,jobID2 to cancel multiple running jobs.
6 Checking job
6.1sinfo command: Look up available resources
When logged in the computing node or login node, type in hostname will output your computational node’s name.
One node has 32 cores, use sinfo to check:
alloc means it has been occupied; idle means it is available.
6.2squeue command: Check running jobs
squeue can check jobs that are running or pending. Below shows the information of all running/down task for the queue comp06 (there are 9 Jobs but only 7 are running). Note that comp06 and comp72 queues share the same nodes, both belonging to pinnacle cluster. There are 49 public standard compute nodes. Thus, if there are 49 running jobs in both queues, then your job has to be waitting until some jobs finished.
For example, below shows all 47 running jobs in comp06/comp72 queues. Some have been running like 2 days. There are 72 hours limit though for all computation nodes.
$ squeue -p comp06,comp72 -t R -u jzhangJOBID PARTITION NAME USER ST TIME NODES NODELIST(REASON)362406 comp06 measr jzhang R 1:04:24 1 c1501362385 comp06 sys/dash ashmitau R 2:07:25 1 c1402362309 comp06 sys/dash igorf R 4:14:32 1 c1402362361 comp06 03a_iqtr amatthew R 55:02 1 c1420362311 comp06 mystery cdgoolsb R 4:09:10 1 c1410362310 comp06 mystery cdgoolsb R 4:09:40 1 c1410362308 comp06 mystery cdgoolsb R 4:14:41 1 c1410362454 comp72 test_str pradeepk R 11:03 1 c1512362150 comp72 cv0_rf igorf R 1-00:43:47 1 c1410362151 comp72 cv1_rf igorf R 1-00:43:47 1 c1410362152 comp72 cv2_rf igorf R 1-00:43:47 1 c1410362137 comp72 sys/dash maghamoh R 1-03:12:27 1 c1410362340 comp72 cv1_pls igorf R 1:00:24 1 c1512362341 comp72 cv2_pls igorf R 1:00:24 1 c1512362339 comp72 cv0_pls igorf R 1:04:24 1 c1501360997 comp72 TiS2-ph bothinah R 2-04:46:42 1 c1609360877 comp72 Temp_230 sppoudel R 54:55 1 c1419360875 comp72 Temp_220 sppoudel R 6:19:42 1 c1415360876 comp72 Temp_225 sppoudel R 6:19:42 1 c1509354260 comp72 peep19-0 djo001 R 11:27:37 1 c1506354262 comp72 peep20-0 djo001 R 11:27:37 1 c1514354263 comp72 peep21-0 djo001 R 11:27:37 1 c1515351991 comp72 peep16-0 djo001 R 12:31:45 1 c1507351988 comp72 peep18-2 djo001 R 14:00:48 1 c1603351987 comp72 peep17-2 djo001 R 14:07:24 1 c1519360873 comp72 Temp_210 sppoudel R 14:49:25 1 c1408360874 comp72 Temp_215 sppoudel R 14:49:25 1 c1418351989 comp72 peep18-0 djo001 R 14:49:55 1 c1516351990 comp72 peep17-0 djo001 R 14:49:55 1 c1518351986 comp72 peep16-2 djo001 R 15:36:01 1 c1605360824 comp72 SmNiO3-2 paillard R 16:23:51 4 c[1405-1406,1503,1508]360871 comp72 Temp_205 sppoudel R 16:23:51 1 c1511360821 comp72 SmNiO3-2 paillard R 1-01:41:15 4 c[1412-1413,1513,1517]360869 comp72 Temp_200 sppoudel R 1-01:41:15 1 c1606360868 comp72 Temp_195 sppoudel R 1-14:30:28 1 c1504349719 comp72 peep8-2 djo001 R 1-16:02:28 1 c1608360867 comp72 Temp_190 sppoudel R 1-20:18:00 1 c1610360818 comp72 SmNiO3-2 paillard R 1-20:18:01 4 c[1404,1409,1502,1505]360866 comp72 Temp_180 sppoudel R 2-04:52:43 1 c1411349718 comp72 peep9-2 djo001 R 2-05:37:18 1 c1604349717 comp72 peep10-2 djo001 R 2-05:51:48 1 c1520349715 comp72 peep12-2 djo001 R 2-09:11:29 1 c1417349716 comp72 peep11-2 djo001 R 2-09:11:29 1 c1607349714 comp72 peep13-2 djo001 R 2-09:30:18 1 c1510338160 comp72 INT3-WT- dgirodat R 2-10:20:18 1 c1407338164 comp72 C1069T-p dgirodat R 2-10:20:18 1 c1414
When you want to get the worst case scenario estimate of when your waiting jobs will start, you can always run following command,
squeue-u[loginname]--start
NoteMore advanced filtering
Use squeue -u [username] | awk '{print $1}' | grep -v JOBID to list all jobs Then, use scancel 'squeue -u [username] | awk '{print $1}' | grep -v JOBID' to cancel multiple running jobs with given JobIDs
Timelimit - Time limit requested for the job with --time
Elapsed - Actual time used by the job
AllocCPUs - Number of allocated CPUs to the job
CPUTime - CPUtime allocated to the job (Elapsed * AllocCPUs)
TotalCPU - Actual CPU time consumed by the job
Most frequently used queues are from pinnacle cluster.
Below is a list of queues in the pinnacle cluster. The number after the queue is the time limit for a running job. For example, comp72 has 72 hour limits while comp06 has only 6 hour limit, but they share same nodes. Thus, for efficiency, maybe use comp01 for quick examination of coding and use comp72 for time consuming jobs.
comp72/06/01: standard compute nodes, 72/6/1 hour limit, 42/46/48 nodesgpu72/06: gpu nodes: 72/6 hour limit, 19 nodesagpu72/06: a100 gpu nodes: 72/6 hour limithimem72/06: 768 GB nodes, 72/6 hour limit, 6 nodespubcondo06: condo nodes all-user use, 6 hour limit, various constraints required, 25 nodespcon06: same as pubcondo06, shortened name for easier printout, use this going forwardcloud72: virtual machines and containers, usually single processor, 72 hour limit, 3 nodescondo: condo nodes, no time limit, authorization required, various constraints required, 25 nodestres72/06: reimaged trestles nodes, 72/06 hour limit, 126 nodesrazr72/06: reimaged razor nodes, 72 hour limit, in progress
Here’s some useful information regarding selecting queue from hpcwiki.
Generally the nodes are reserved for the most efficient use, especially for expensive features such as GPU and extra memory. Pinnacle compute nodes are very busy (comp.. and himem.. partitions) are reserved for scalable programs that can use all 32/24 cores (except for the cloud partition, and condo usage by the owner). Cores are allocated by the product of ntasks-per-node x cpus-per-task. Exceptions: (1) serial/single core jobs that use more memory than available on Razor/Trestles (64 to 192 GB) (2) multiple jobs submitted together that use a whole node, such as 4 x 8 cores (3) two jobs on one high-memory node (2 x 12 cores) that each use more than 192 GB (and less than 384 GB so that they can run on the himem node)
6.4 Count running jobs
Following bash command is a general command to cound running jobs on himem72 queue. -p himem72 filters jobs running on the partition himem72. -t R filters the “running” status (other status include ‘PD’ which means pending). wc is a bash command to count number of lines/bytes.
You can check running jobs for multiple users. For example, squeue -t R -u user1,user2 | wc counts user1’s and user2’s running jobs.
squeue-u jzhang -t R -p himem72 |wc
7 Troubleshooting
Revise .bashrc so that the ssh cannot login?
You potential can try ctrl+c to avoid the ssh to execute bashrc. Try multiple time if not succeed. See here for reference.
8 Example 1: parallelization of Stan
Let’s assume we have a job task to run multiple Bayesian models with K Markov Chains. For each Bayesian model, we have an independent R file. In total, we have J .R modeling files. For each independent R file, we input one data set. There are N data sets in total with multiple simulation conditions.
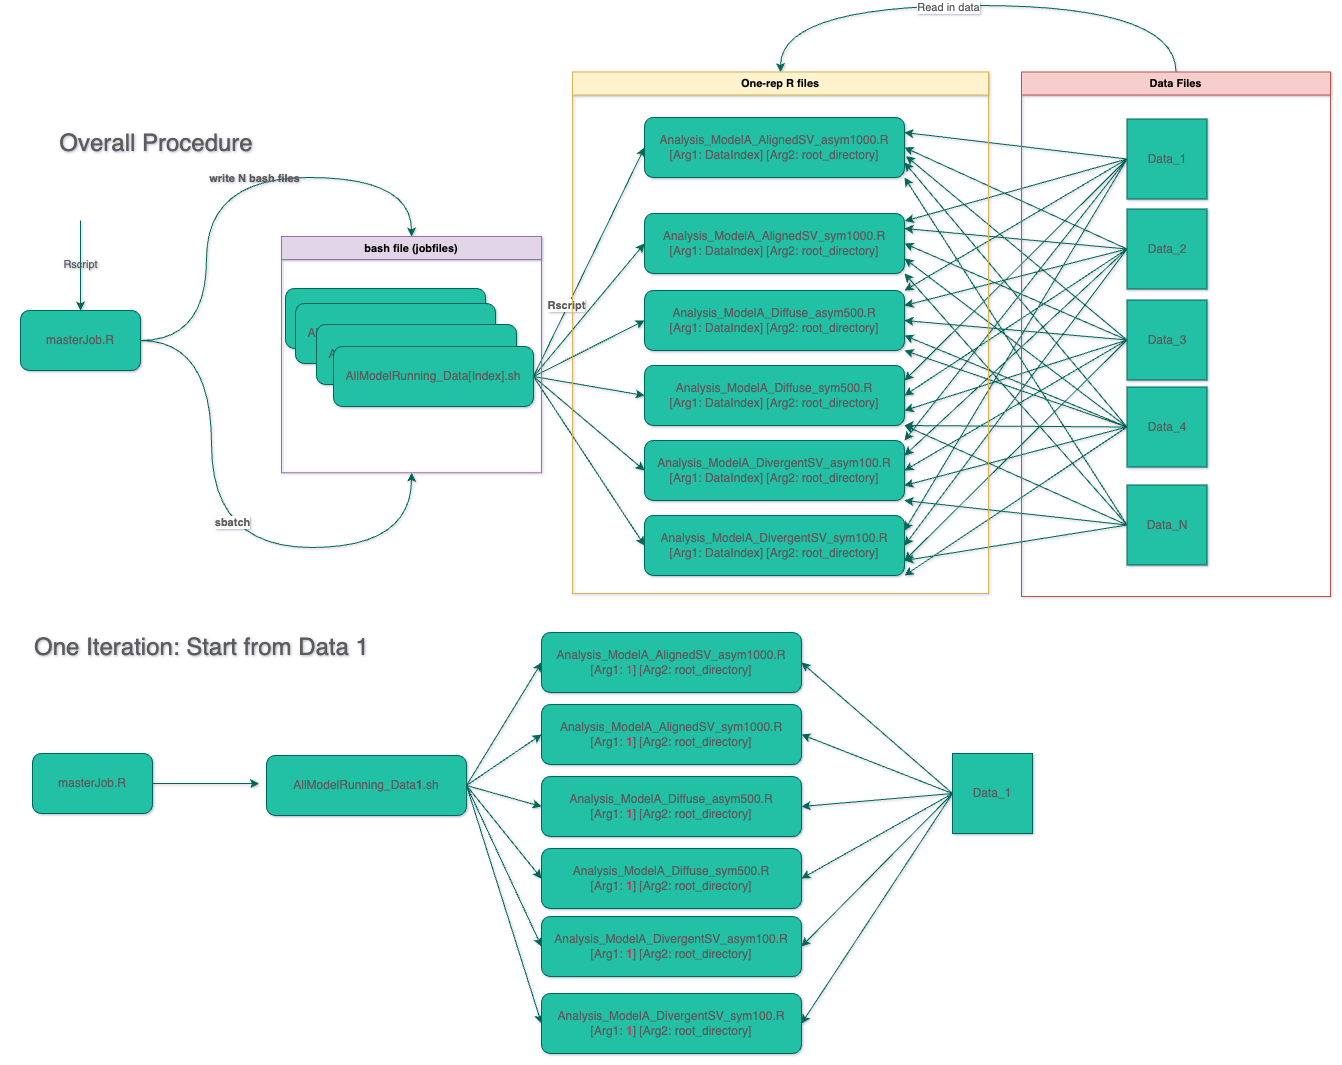
The workflow for this job task is like this:
Workflow for HPC Job
8.1 Overall Procedure
First of all, we need to create a master job file, masterJob.R file1, for two purposes:
to create multiple bash job files with each corresponds to run one or multiple analysis models;
to submit the data analysis job to the computing server. In masterJob.R, there may exist nested “for loop” with datasets/design factors as iterators.
The content of masterJob.R depends on a template job file .sh, your execution files (e.g., .r), data sets (e.g., .csv). For example, below is an example masterJob.R file. Iterator i represents the index of data set.
masterjob_All.R
library(tidyverse)root_path ="~/Downloads/JZ/"# change to folder in your HPCfor (i in1:10) { jobfile <-paste0("AllModelRunning_data", i, ".sh")## --ntasks-per-node=6 : there are 6 R files to be running parallels.## --cpus-per-task=3: for each R files, there are 3 chains initial <-"#!/bin/bash#SBATCH --partition tres288#SBATCH --qos tres#SBATCH --nodes=1#SBATCH --ntasks-per-node=6#SBATCH --cpus-per-task=4#SBATCH --time=288:00:00source /etc/profile.d/modules.shmodule purgemodule load intel/21.2.0 mkl/21.3.0 R/4.2.2 gcc/11.2.1cd $SLURM_SUBMIT_DIR "## adding all R files simultaneously jobfile_content <-paste0(initial, paste0("\nRscript ", root_path,"RcodeJZ2/Analysis_ModelA_AlignedSV_asym1000.R "), i, " '" , root_path, "' | at now &") jobfile_content <-paste0(jobfile_content, paste0("\nRscript ", root_path,"RcodeJZ2/Analysis_ModelA_AlignedSV_sym1000.R "), i, " '" , root_path, "' | at now &") jobfile_content <-paste0(jobfile_content, paste0("\nRscript ", root_path,"RcodeJZ2/Analysis_ModelA_Diffuse_asym500.R "), i, " '", root_path, "' | at now &") jobfile_content <-paste0(jobfile_content, paste0("\nRscript ", root_path,"RcodeJZ2/Analysis_ModelA_Diffuse_sym500.R "), i, " '", root_path, "' | at now &") jobfile_content <-paste0(jobfile_content, paste0("\nRscript ", root_path,"RcodeJZ2/Analysis_ModelA_DivergentSV_asym100.R "), i, " '", root_path, "' | at now &") jobfile_content <-paste0(jobfile_content, paste0("\nRscript ", root_path,"RcodeJZ2/Analysis_ModelA_DivergentSV_sym100.R "), i, " '", root_path, "' | at now & wait")write_lines(jobfile_content, file =paste0(root_path, "JobFiles/", jobfile))# message(commd)system(paste0("sbatch ", paste0(root_path, "JobFiles/", jobfile)))}
If we want to iterate over all N data sets, we can set for (i in 1:N). The initial partical contains the settings of HPC jobs: 1 node, each node run 6 tasks, and each task uses 4 cpus. If we run a Bayesian model with 3 chains, we can set --cpus-per-task=3 instead. Each modeling file (for example, Analysis_ModelA_AlignedSV_asym1000.R) will be subjected to run using Rscript with two arguments: (1) data set index (i); (2) root directory containing all codes and data sets (root_path). The first argument make sure each file will be fed to modeling file. The second argument makes the masterJob file more generic to run on varied HPC accounts.
write_lines function saves the text of job file into a local directory in root direcotry – JobFile. system is a R function that can run bash code in R. Here we echo sbatch [OneJobFile].R to make R automatically submit the JobFile for specific data set.
Alternatively, we can set up the masterJob file to run one model only:
masterJob_AlignsedSV_asym100.R
library(tidyverse)root_path ="~/Downloads/JZ/"for (i in1:10) { jobfile <-paste0("AlignsedSV_asym100_ModelRunning_data", i, ".sh") # change file for specific model## --ntasks-per-node=6 : there are 6 R files to be running parallels.## --cpus-per-task=3: for each R files, there are 3 chains initial <-"#!/bin/bash#SBATCH --partition tres288#SBATCH --qos tres#SBATCH --nodes=1#SBATCH --ntasks-per-node=6#SBATCH --cpus-per-task=4#SBATCH --time=288:00:00source /etc/profile.d/modules.shmodule purgemodule load intel/21.2.0 mkl/21.3.0 R/4.2.2 gcc/11.2.1cd $SLURM_SUBMIT_DIR "## adding all R files simultaneously jobfile_content <-paste0(initial, paste0("\nRscript ", root_path,"RcodeJZ2/Analysis_ModelA_AlignedSV_asym1000.R "), i, " '" , root_path, "'")write_lines(jobfile_content, file =paste0(root_path, "JobFiles/", jobfile))# message(commd)system(paste0("sbatch ", paste0(root_path, "JobFiles/", jobfile)))}
To make sure it running without error, we need to check each modeling file carefully.
For example, below is one of six modeling files: Analysis_ModelA_AlignedSV_sym1000.R.
Part I of this modeling file is to read in two arguments of Rscript specified in masterJob_All.R. Part II contains all functions needed for Bayesian models running. Part III screens all data sets saved in the folder dataJZ and creates a vector of paths of the data set dataset_fullpaths. It also creates a list of unique identifiers for each result of model datset_prefix. Finally, it run the Bayesian model with 3 Markov chains.
Analysis_ModelA_AlignedSV_sym1000.R
############################################### Part I #########################################args <-commandArgs(trailingOnly =TRUE)which_dat <-as.numeric(args[1])root_path =as.character(args[2]) # root directory############################################### Part II ########################################### function 1: for one Bayesian model runningBayAna <-function(mod, dat, ncores) {...}## function 2: run four Bayesian models with different model structure and save resultsBayFit_new <-function(dname, ncores, outputpath, prefix){...}############################################### Part III #########################################datset_paths <-list.files(paste0(root_path, "dataJZ/"), pattern ='.dat',recursive =TRUE)datset_fullpaths <-paste0(paste0(root_path, "dataJZ/"), datset_paths)datset_prefix <- stringr::str_replace_all(datset_paths, "/", "_")BayFit_new(dname = datset_fullpaths[which_dat],outputpath =paste0(root_path, "ResultJZ/"),prefix = datset_prefix[which_dat],ncores =3)
For better illustration, below is the top 10 elements of datset_fullpaths :