Introduction to Git and GitHub
What is Git?
- A distributed version control system
- Tracks changes in files
- Allows multiple users to work on the same project
Why Use Git?
- Version Control: Keep track of changes made to code or documents
- Collaboration: Allow multiple developers to work on the same codebase
- Backup: Keep a backup of previous versions of your project
What is GitHub?
- A platform for hosting Git repositories
- Enables collaboration with others on code-based projects
- Provides cloud storage for your code
Git vs. GitHub
- Git: A tool for managing versions of your code locally
- GitHub: A web-based service for hosting Git repositories and collaboration
Setting Up Git
- Install Git on your computer
- Configure Git in your terminal
git config --global user.name "Your Name"
git config --global user.email "youremail@example.com"- Install GitHub Desktop
Comment
byu/Electronic_Ad2207 from discussion
ingit
Comment
byu/Electronic_Ad2207 from discussion
ingit
Basic Git Commands
git init: Initialize a new Git repositorygit add <file>: Stage changes for commitgit commit -m "message": Save changes with a commit messagegit status: Check the status of your filesgit log: View commit history
Git Terminal
Creating a GitHub Repository
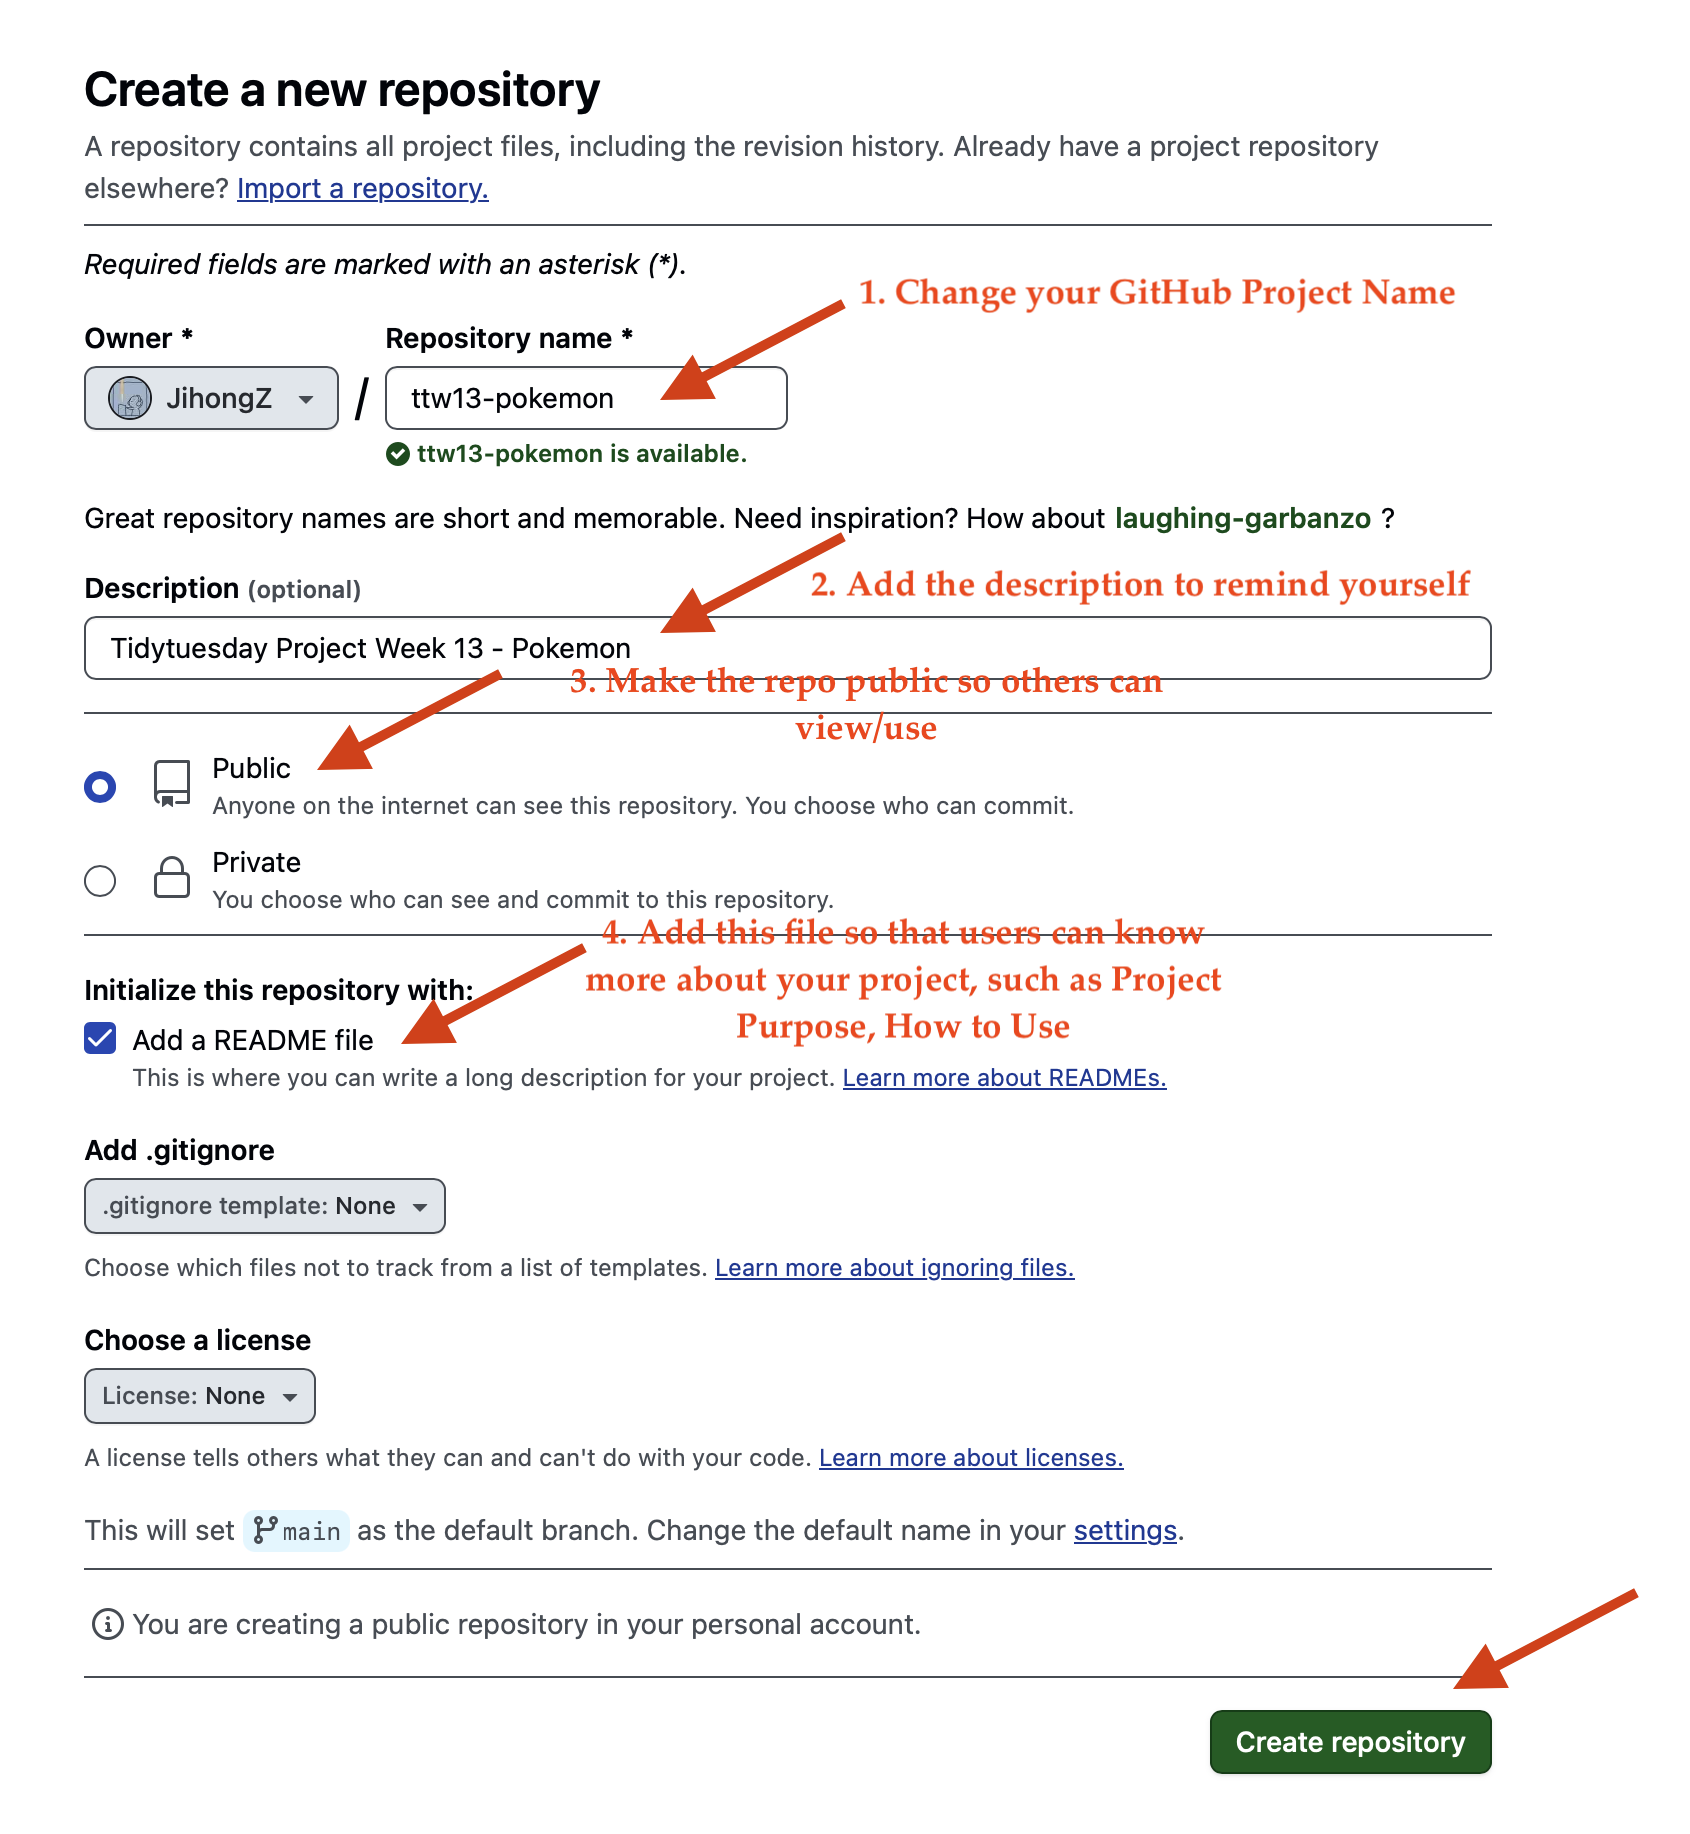
- Go to GitHub.
- Click on the + icon at the top right corner and select New repository.
- Name your repository and choose whether it will be public or private.
- Click Create repository.
Cloning the Repository to Your Local Machine
Once the repository is created on GitHub, follow these steps to clone it to your local machine.
Copy the repository URL from GitHub.
In your terminal, type:
git clone https://github.com/yourusername/yourrepository.gitNavigate into the repository:
cd yourrepository
Modify Files Locally
Create a new file or modify an existing one. Example: Create a file
hello.txtwith the content:Hello, GitHub! This is my first file.Check the status of the changes:
git status
Staging Changes
After modifying the files, you need to stage the changes before committing them.
Stage the file using the
git addcommand:git add hello.txtCheck the status again to confirm the file is staged:
git status
Committing Changes
Commit the staged changes with a descriptive message:
git commit -m "Add hello.txt with initial content"View the commit history:
git log
Pushing Changes to GitHub
Now that the changes are committed locally, you can push them to GitHub.
Push the changes to the GitHub repository:
git push origin mainCheck the repository on GitHub, and you should see the file
hello.txtuploaded.
Modifying Existing Files
Modify an existing file (e.g.,
hello.txt).Stage the changes:
git add hello.txtCommit the changes with a message:
git commit -m "Update hello.txt with a new message"Push the changes to GitHub:
git push origin main
Branching and Merging
Create a new branch:
git branch new-feature
git checkout new-feature
Make some changes in a file (e.g., update
hello.txt).Stage and commit those changes:
git add hello.txt
git commit -m "Add a new feature"
Merge the
new-featurebranch back tomain:git checkout main git merge new-featurePush the merged changes to GitHub:
git push origin main
Collaborative Workflow on GitHub
Fork a repository on GitHub.
Clone the forked repository to your local machine:
git clone https://github.com/yourusername/forked-repository.gitCreate a new branch:
git branch my-branch
git checkout my-branch
Make changes, commit them, and push them to GitHub:
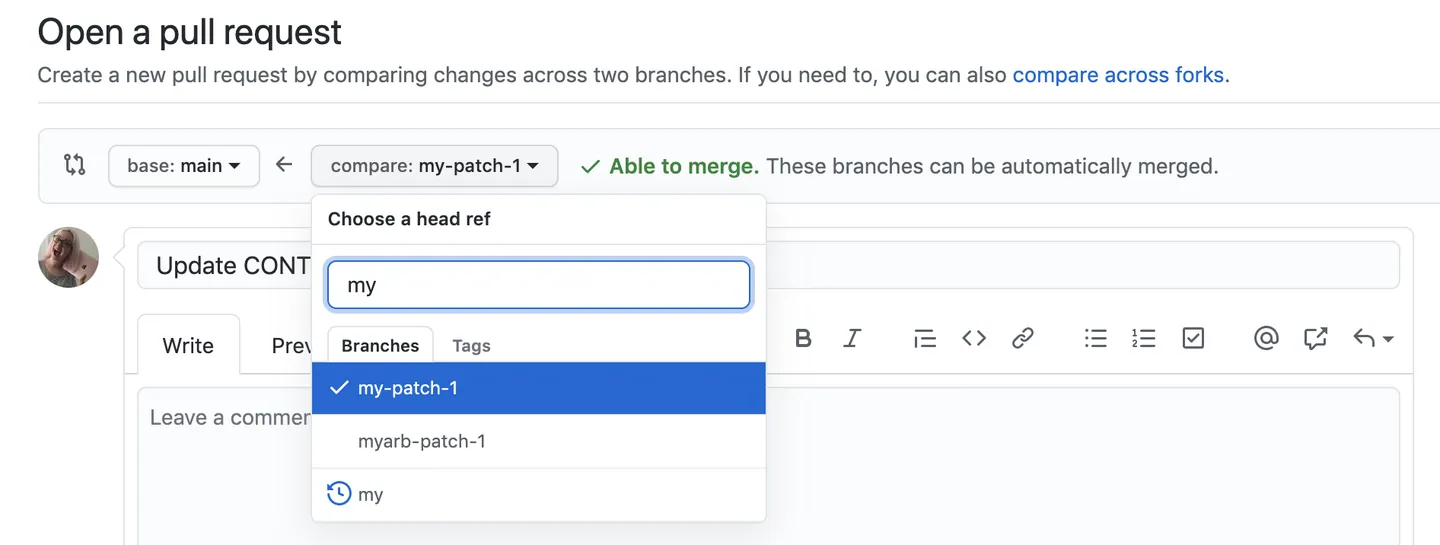
git add .
git commit -m "Describe the changes"
git push origin my-branch
Create a pull request to merge your changes into the original repository.
A More user-friendly method - GitHub Desktop
GitHub Desktop: Commit Existing Folder
Example: Create a new github repository
- You start with a new project
Steps for Students to Follow:
- Create a new GitHub repository.
- Clone the repository to their local machine using
git clone. - Add the
README.mdfile into the repository - Stage, commit, and push the changes back to GitHub.
Now you prepared all skills for R project
TidyTuesday Project
![]()
Tidytuesday is a weekly social data project that provide a dataset every Tuesday for data scientists to visualize, dashboard, develop shiny app (“tidytuesday GitHub”).
- Data is posted to social media every Monday morning.
- Explore the data, watching out for interesting relationships.
- Create a visualization, a model, a Quarto report, a shiny app, or some other piece of data-science-related output, using R, Python, or another programming language.
- Share your output and the code used to generate it on social media with the #TidyTuesday hashtag.
Today Let’s Play with the data
Project Plan
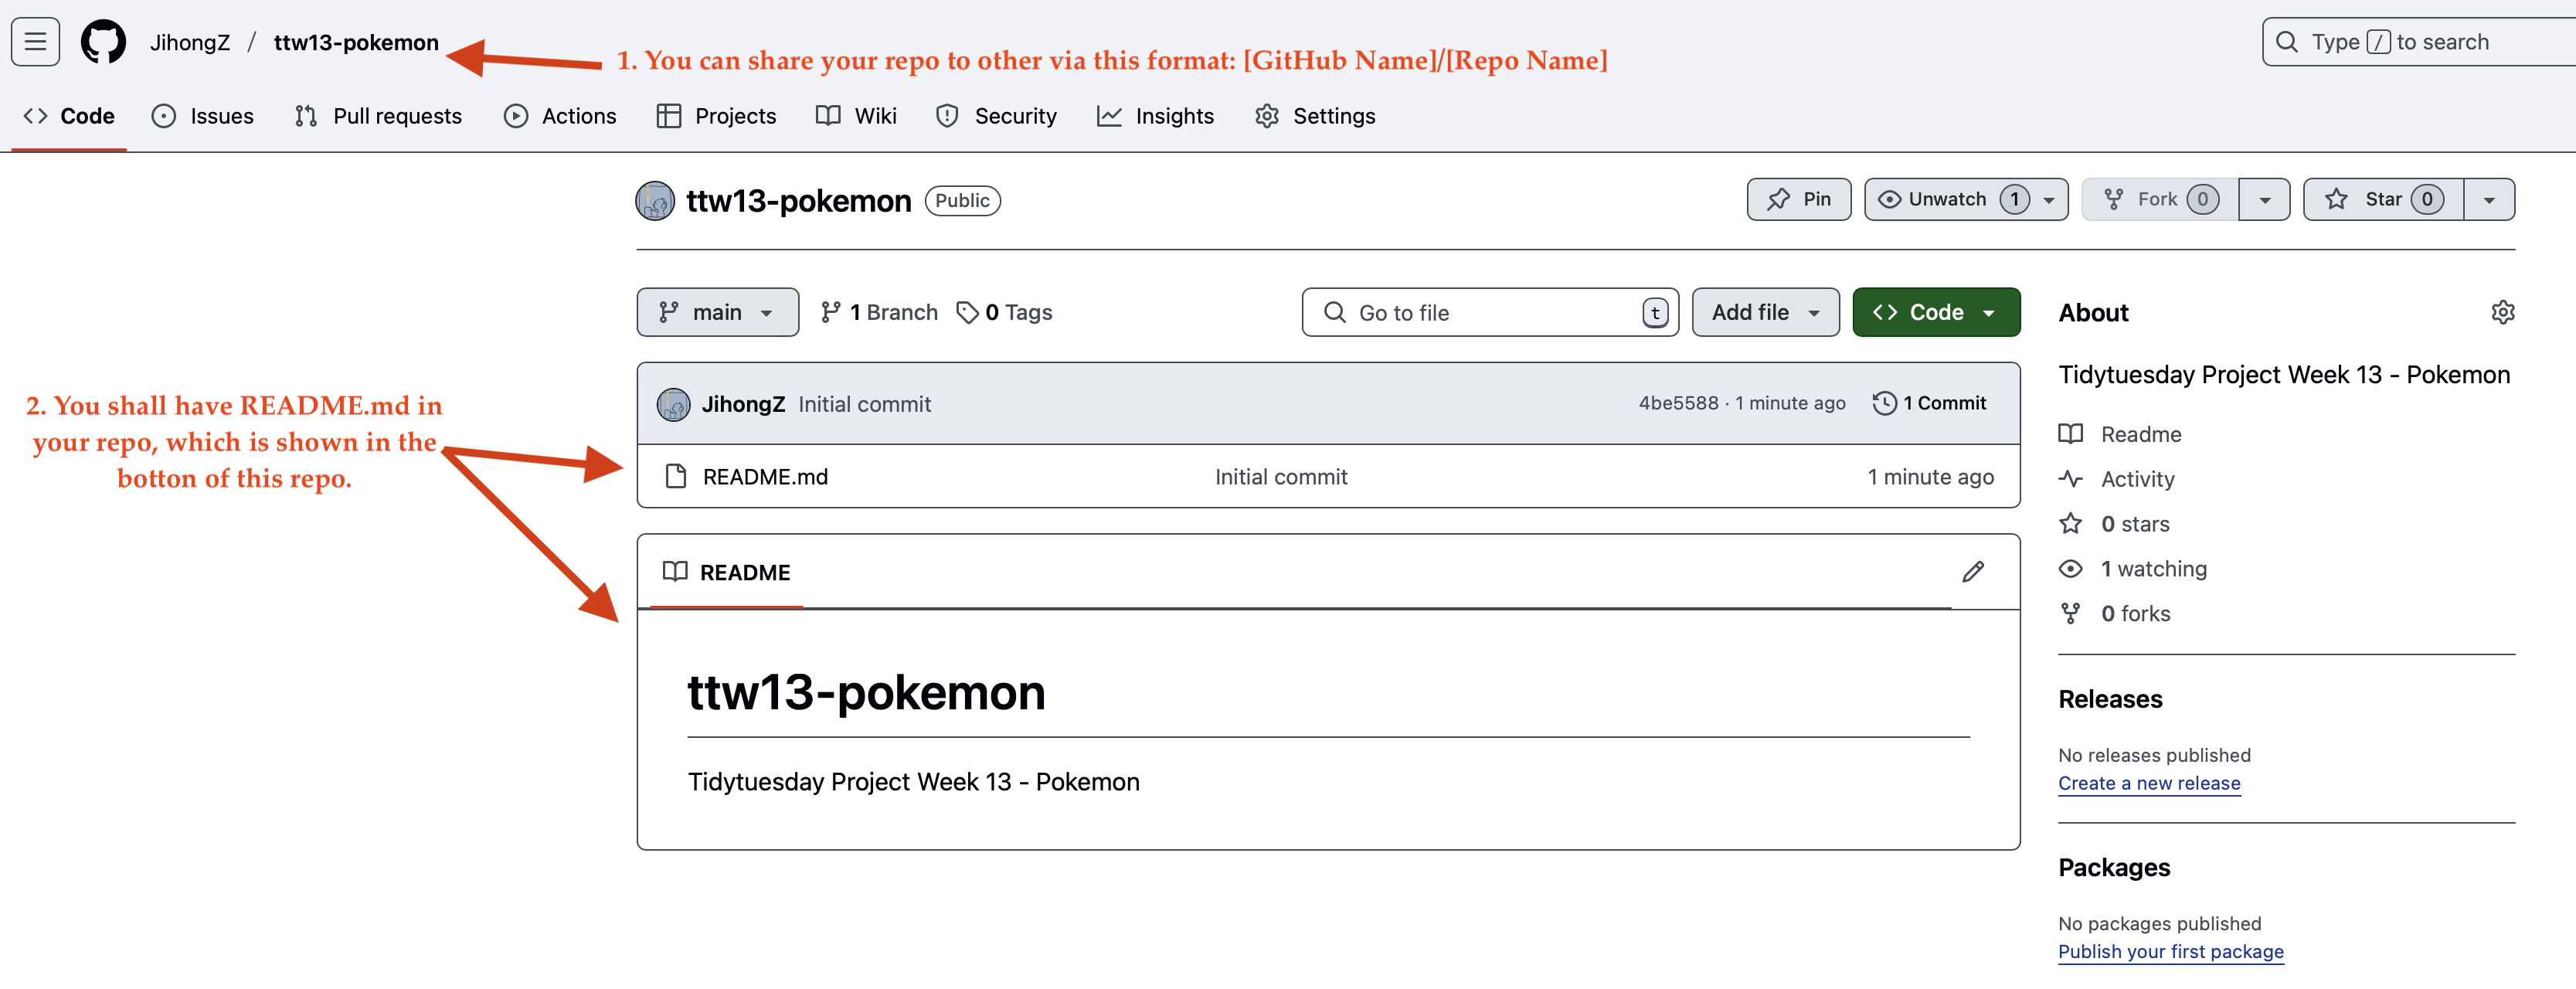
Step 1: Create a new Git Repo with the name
ttw13-pokemonStep 2: Pull the repo into local
Step 3: Create a R Project using Rstudio
Step 4: Authoring:
.Rfile to store functions and.qmdfile to report your results.Step 5: Push your local changes into GitHub for others to review.

Step 1: Create a new repository
Step 2: Pull the Repo to the Local
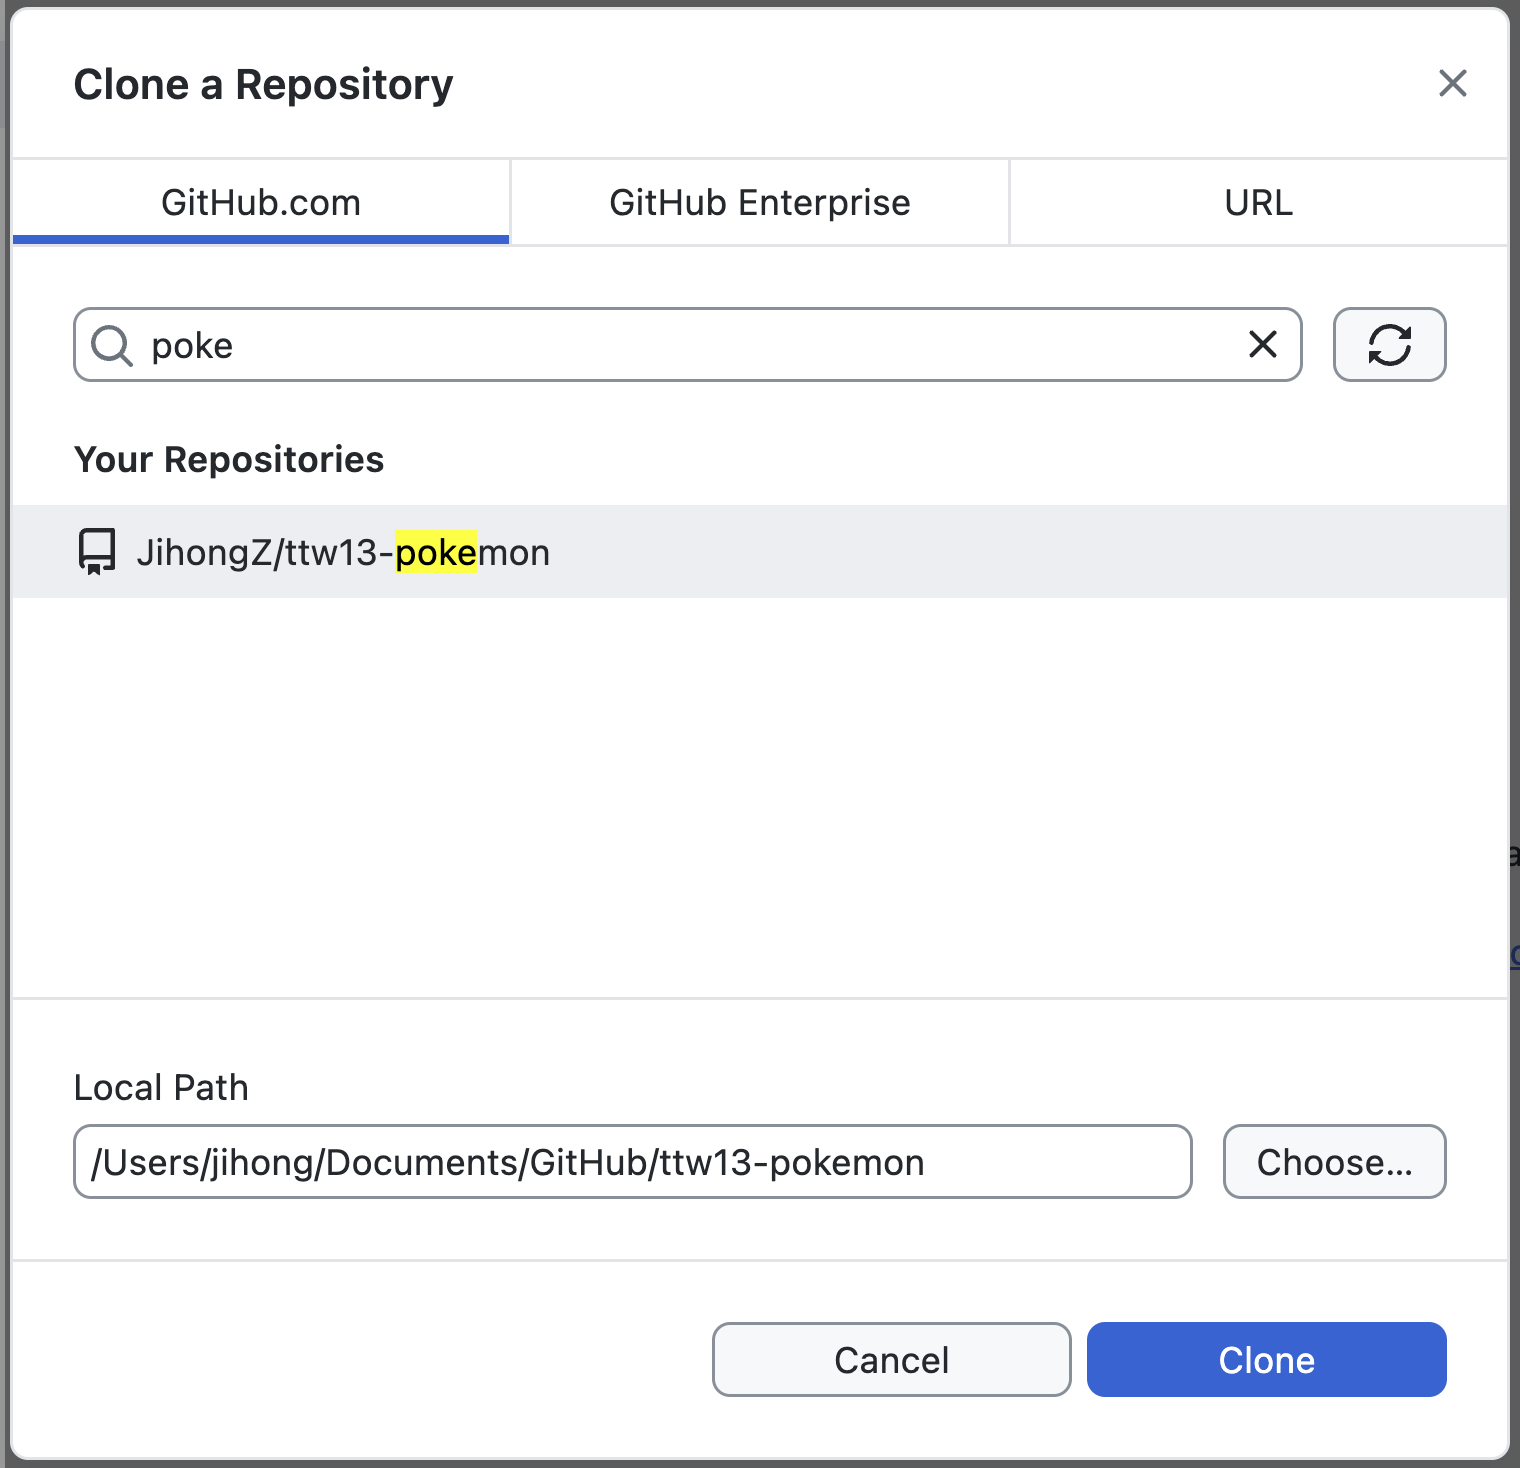
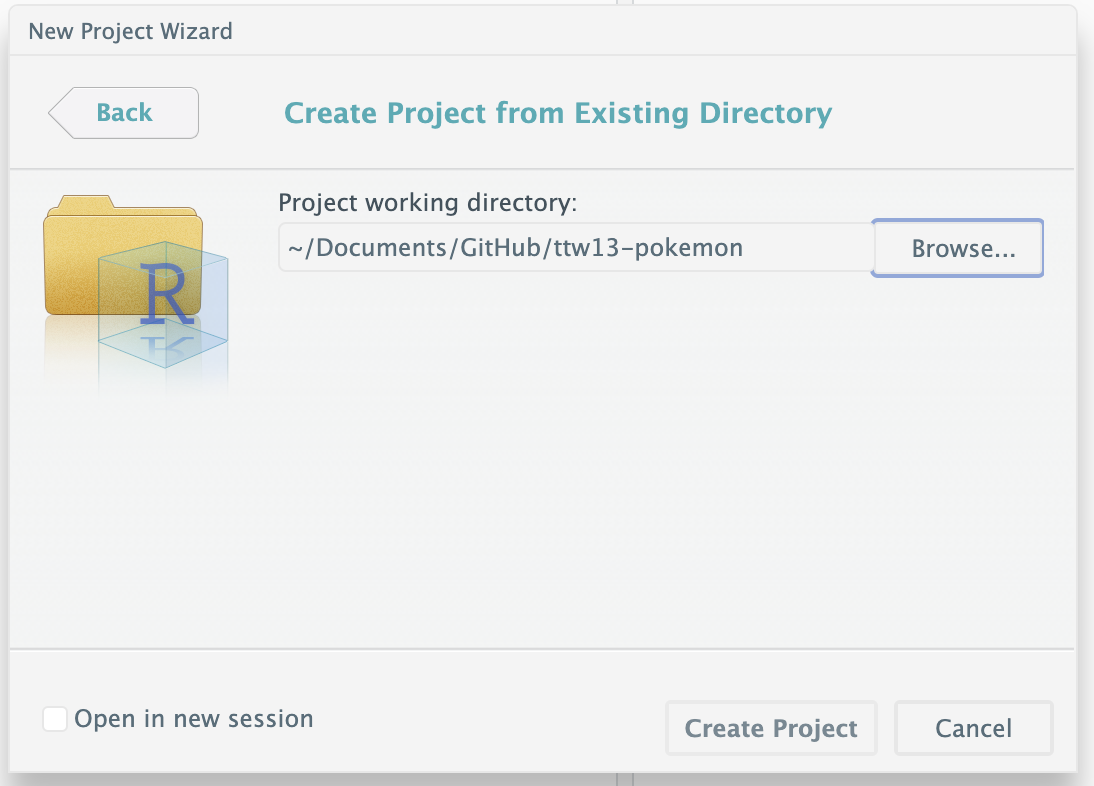
Open up GitHub Desktop, Click Current Repository > Add > Clone Repositoty.
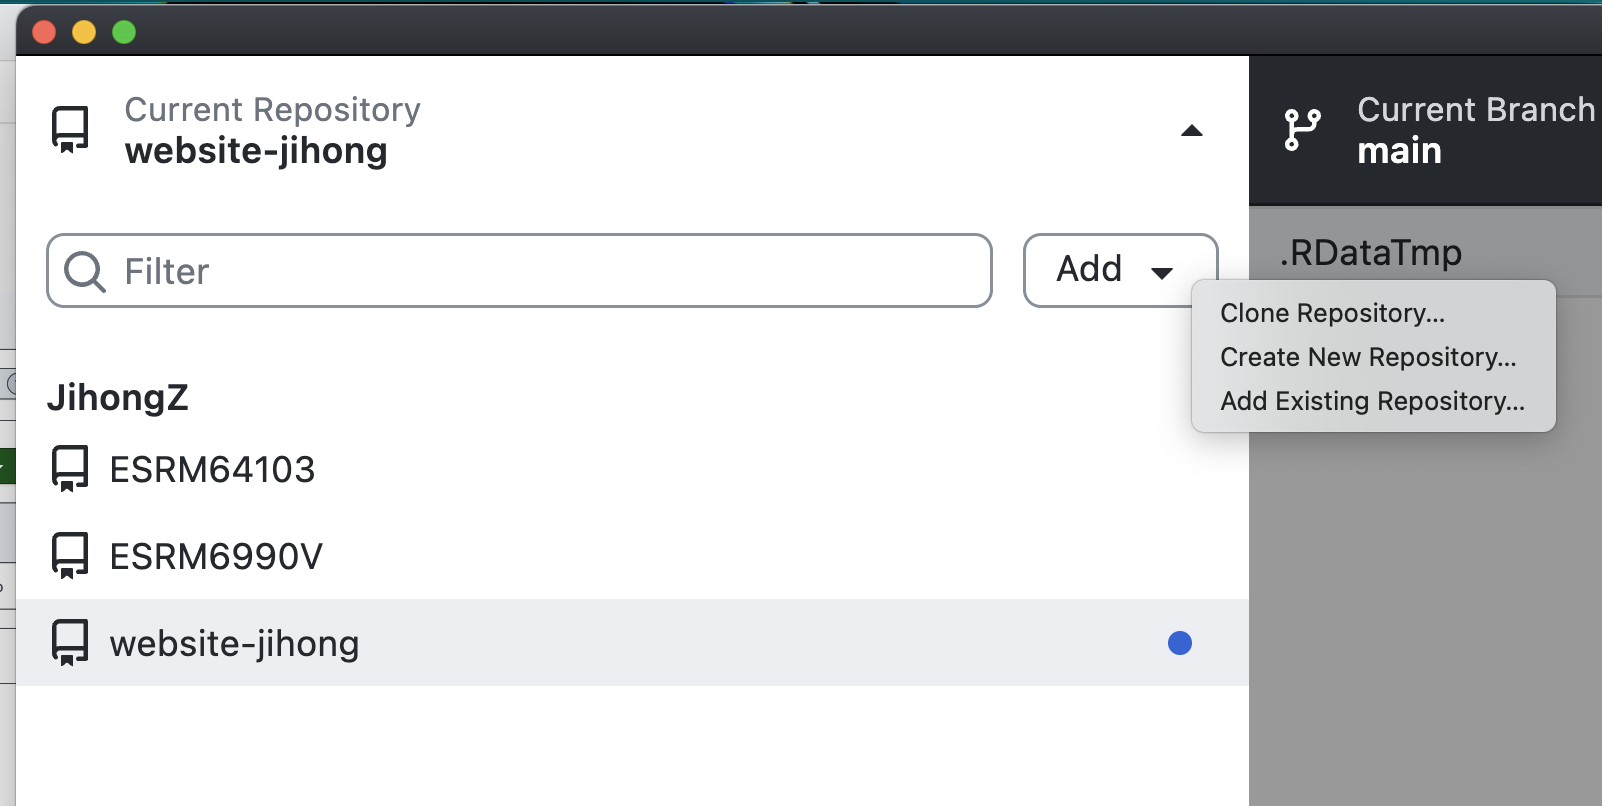
In the pop-up window, search poke, then your Repository just created will show up. Click Choose to change the Local Path where you want to store your project, then click Clone.
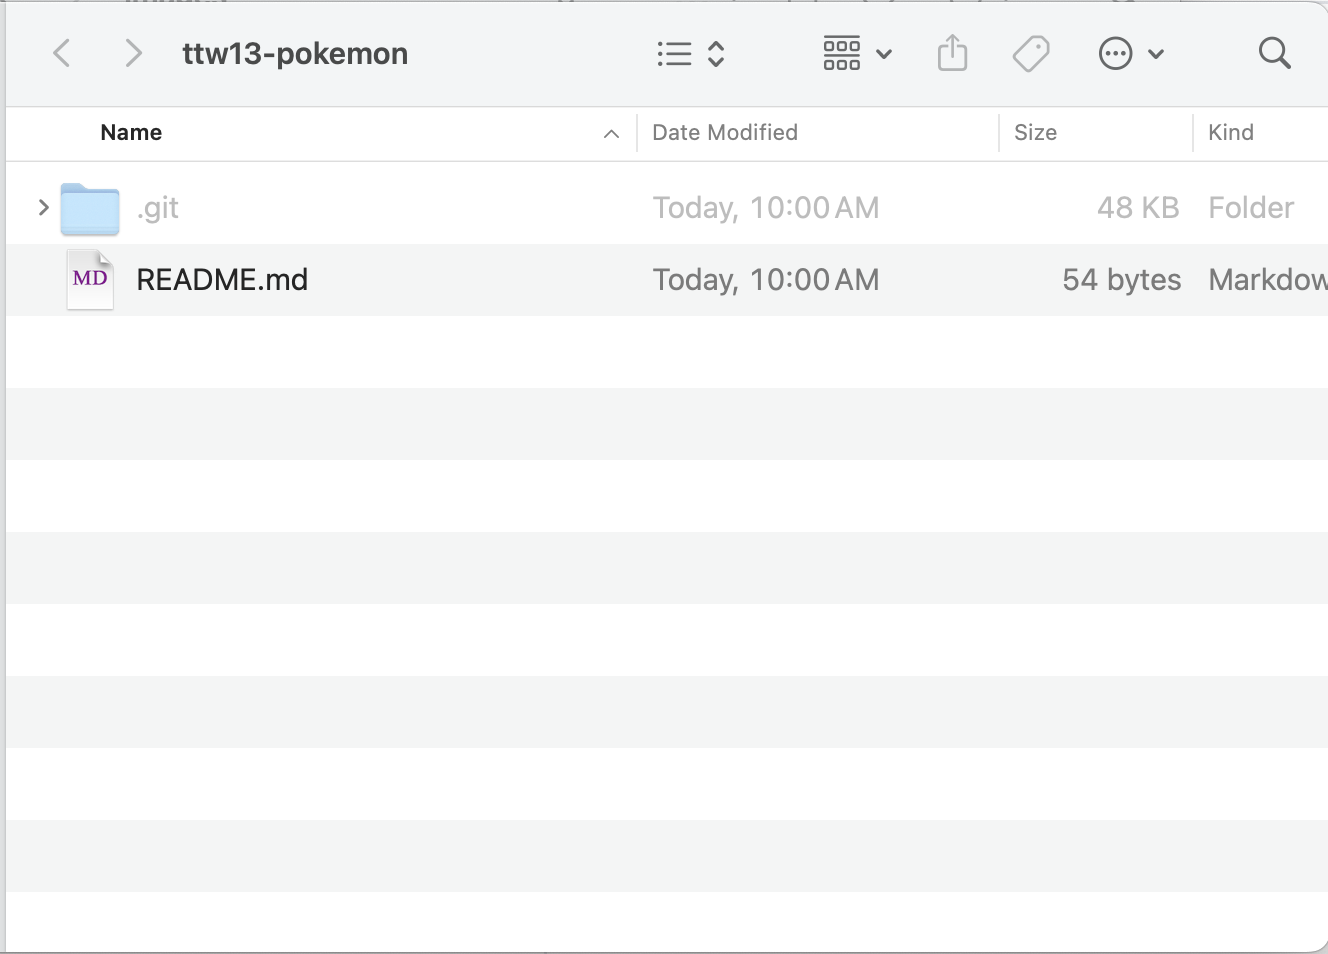
Open you File Management, you shall see a folder named ttw13-pokemon.
Step 3: Create R Project
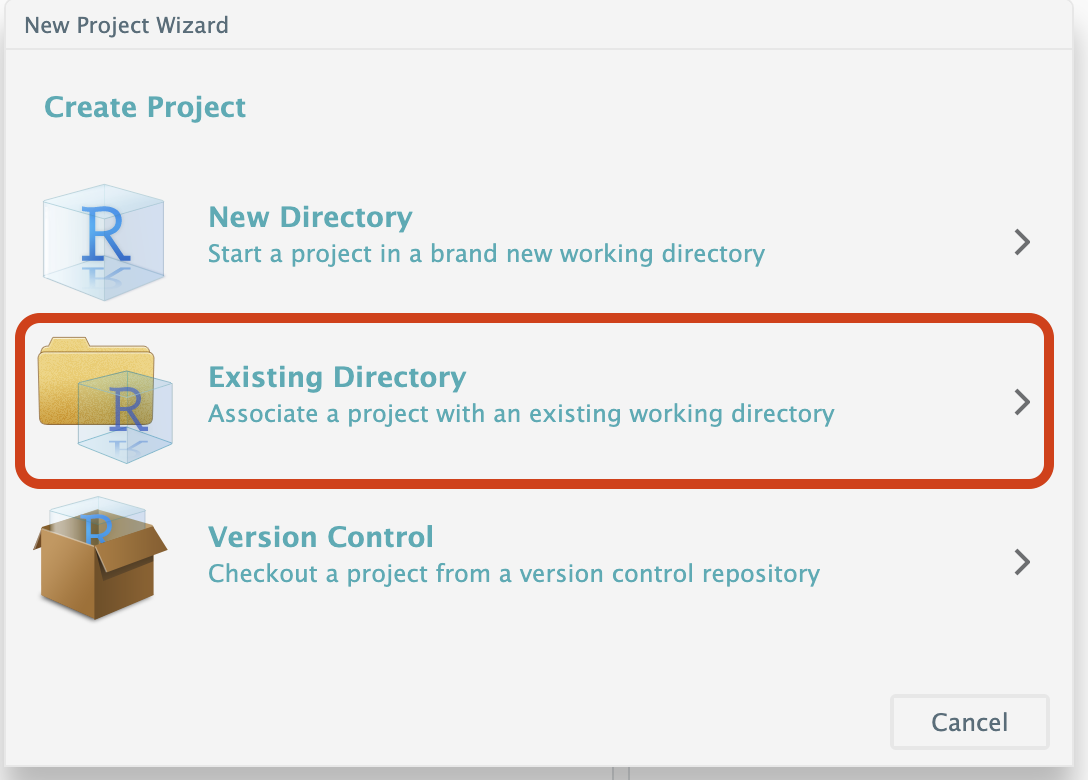
Create a Quarto Document called pokemon, and a R file called pokemon_funs.


Step 4: Authoring Quarto and R file
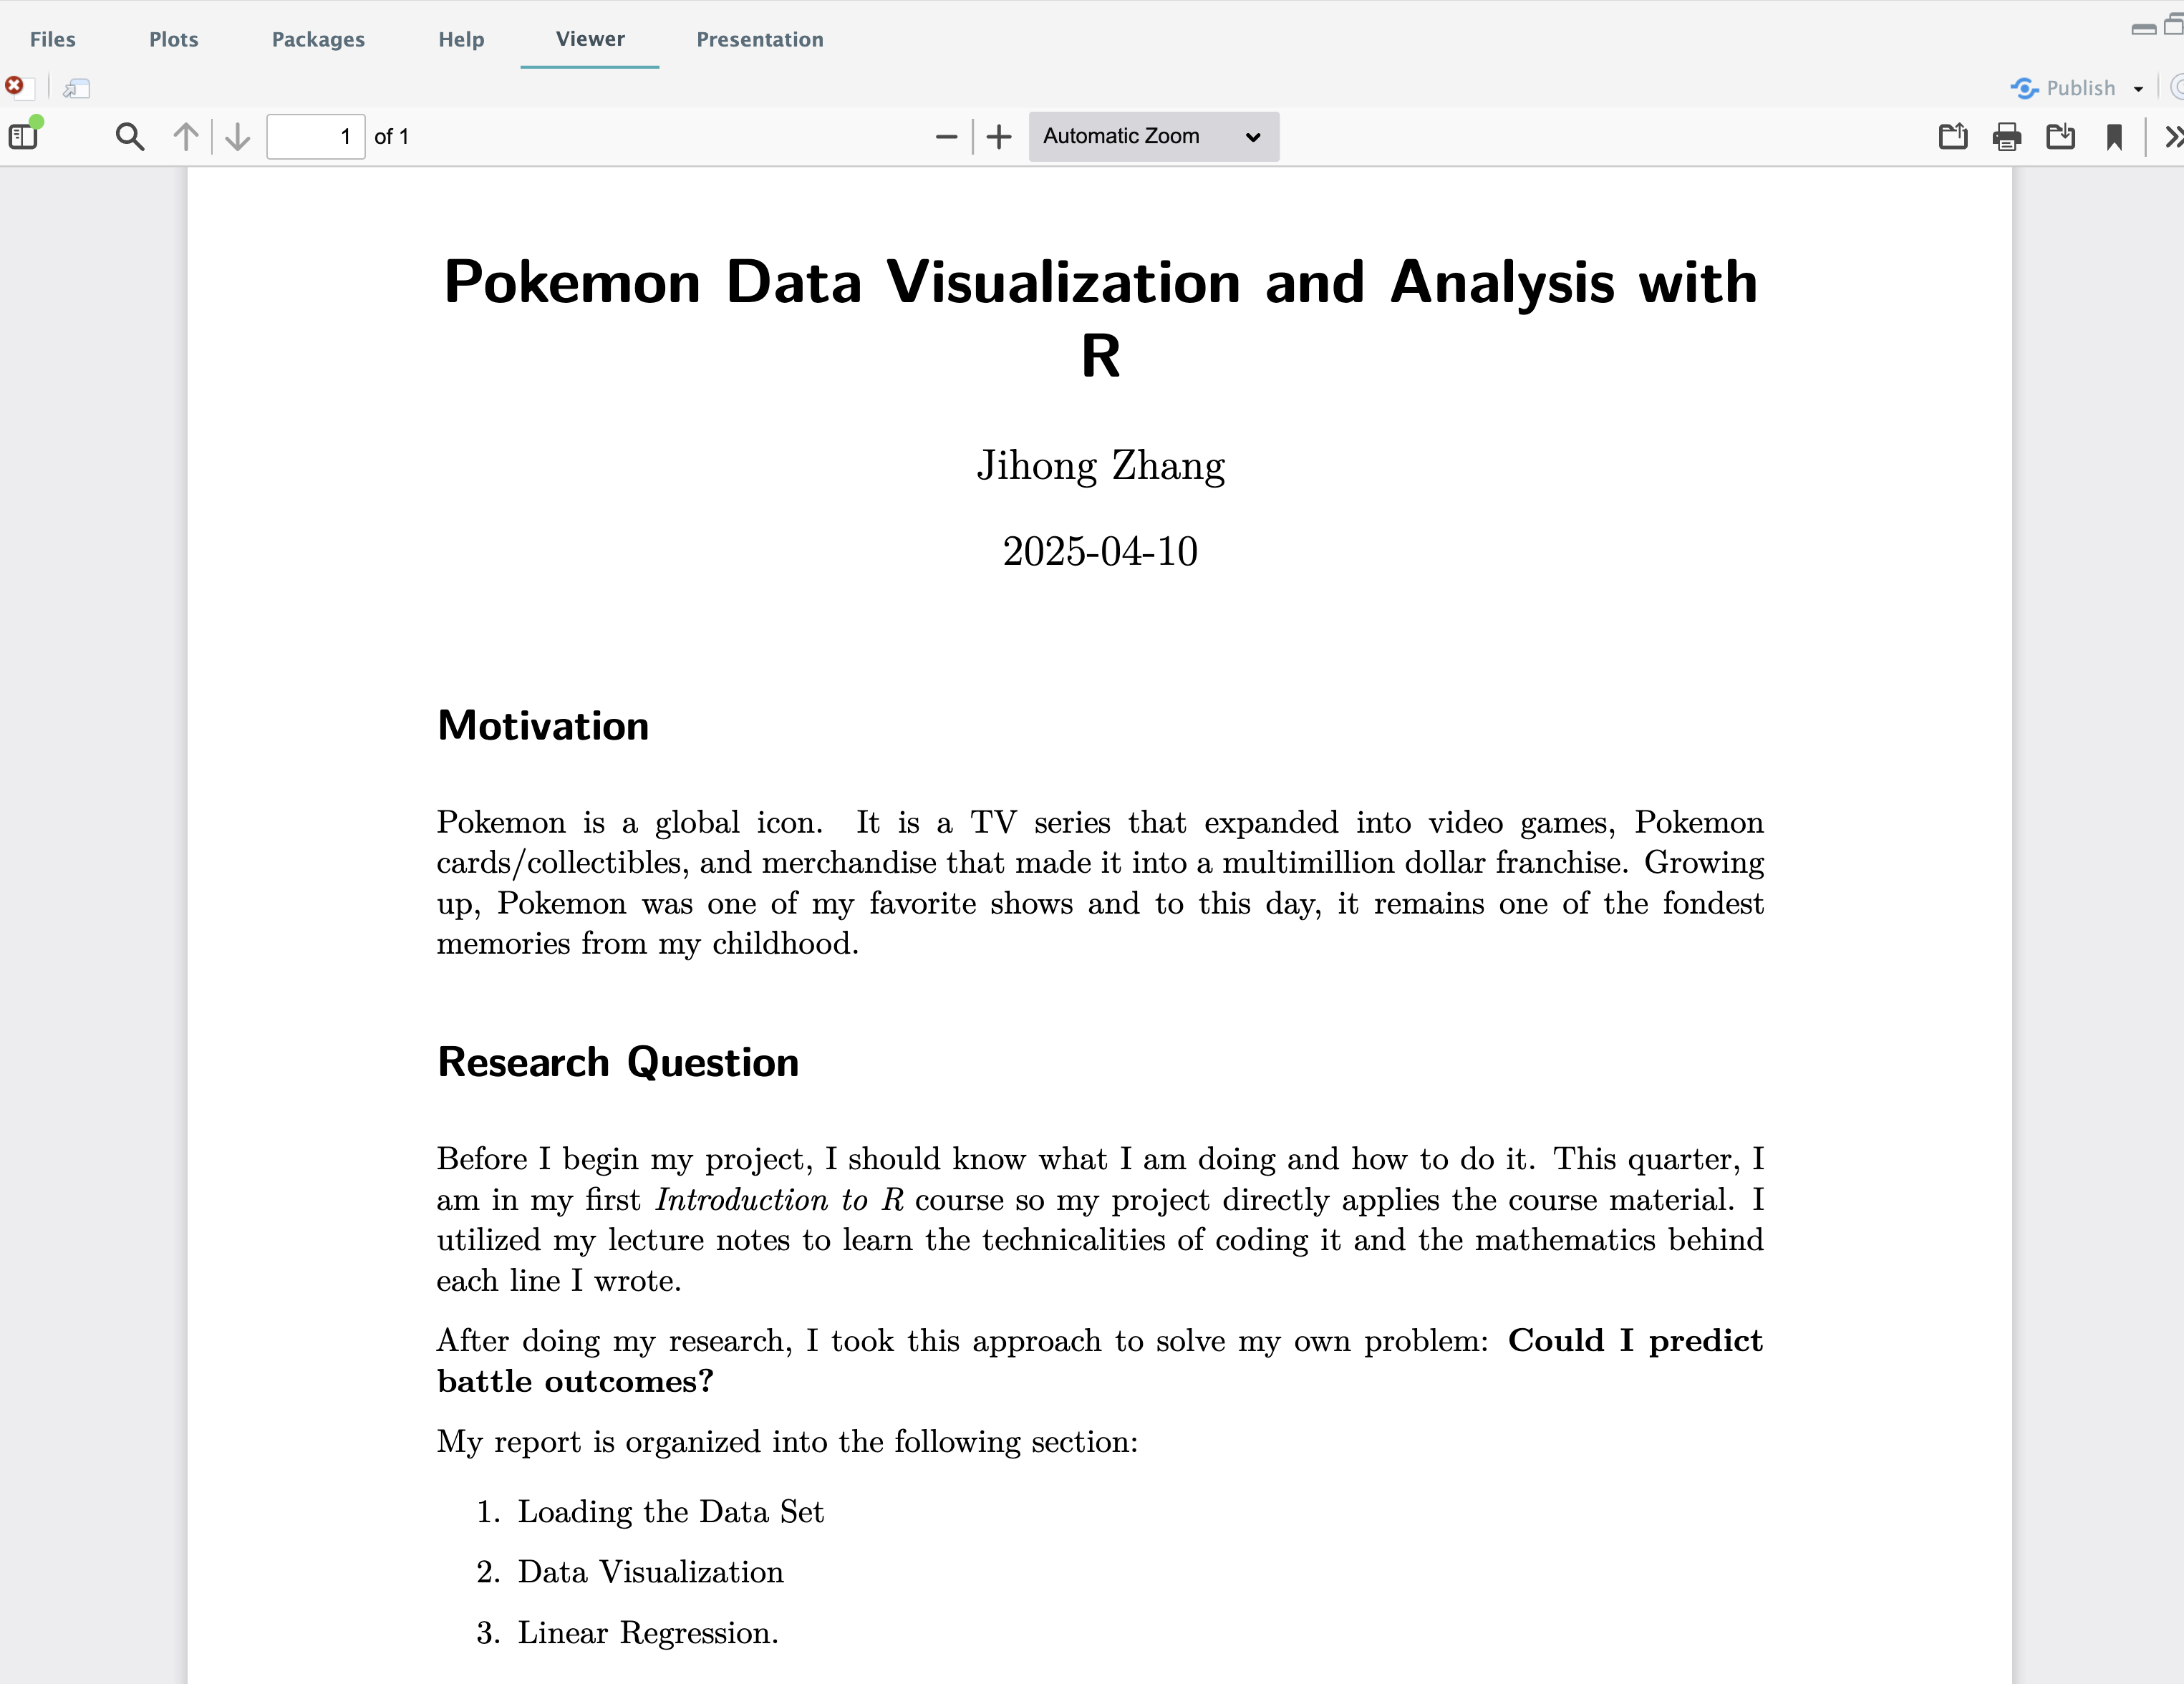
Open up your pokemon.qmd file, in the begining of your file, replace the YAML with the followings:
---
title: "Pokemon Data Visualization and Analysis with R"
author: "Jihong Zhang"
date: "2025-04-10"
format: pdf
---
Still in pokemon.qmd file, cope and paste the following markdown text after the YAML header:
# Motivation

Pokemon is a global icon. It is a TV series that expanded into video games, Pokemon cards/collectibles, and merchandise that made it into a multimillion dollar franchise. Growing up, Pokemon was one of my favorite shows and to this day, it remains one of the fondest memories from my childhood.

# Research Question

Before I begin my project, I should know what I am doing and how to do it. This quarter, I am in my first *Introduction to R* course so my project directly applies the course material. I utilized my lecture notes to learn the technicalities of coding it and the mathematics behind each line I wrote.

After doing my research, I took this approach to solve my own problem: **Could I predict battle outcomes?**

My report is organized into the following section:

1. Loading the Data Set

2. Data Visualization

3. Linear Regression.
Click  button, do you see a PDF file in the
 Viewer panel?
Open up pokemon_funs.R, write up and test your R code including data importing, data visualization and modeling code.
Check the Tidytuesday’s Document – Pokemon dataset to know more details about the sampled data.
As an example, copy and paste the following code.
pokemon_funs.R
# Using R
# Option 1: tidytuesdayR R package
## install.packages("tidytuesdayR")
if( !require(GGally)){
  install.packages("GGally")
}
if( !require(tidyverse)){
  install.packages("tidyverse")
}

data_url <- 'https://raw.githubusercontent.com/rfordatascience/tidytuesday/main/data/2025/2025-04-01/pokemon_df.csv'
pokemon <- readr::read_csv(data_url, col_select = c("id", "pokemon", "type_1", "type_2",  "hp", "attack", "defense", "special_attack", "special_defense", "speed"))
NewNames <- c('Number', 'Names', 'Type1', 'Type2', 'HP', 'Attack', 'Defense', 'SpAttack', 'SpDefense', 'Speed')
names(pokemon) <- NewNames

cols_to_check <- c("HP", "Attack", "Defense", "SpAttack", "SpDefense", "Speed")
pokemon[, cols_to_check]


fig1 <- ggplot(data=pokemon, mapping=aes(x=Attack, y=Defense, color=Type1))+
  geom_boxplot()+
  coord_flip()

fig2 <- ggpairs(pokemon, columns = 5:10)


## Linear regression
model1= lm(HP ~ Speed + Attack + Defense + SpAttack + SpDefense, data=pokemon)

tbl1 <- summary(model1)$coefficients
After you are satisfied with your data analysis results, write up your Quarto markdown to combine your interpretion and computational results togethor.
As one example, copy the following text and append it to the end of your Quarto file — pokemon.qmd.
pokemon.qmd
## Data Visualization

Data visualization is a powerful tool. @fig-boxplot shows the characteristics by their Types.

#| message: false
#| echo: false
#| fig-cap: "Boxplot of denfense and attack by their types"
#| label: fig-boxplot
source("pokemon_funs.R")
fig1

Second, I check out the relationships among six dimensions of information of Pokemon using pairwise scatterplot. As shown in @fig-scatter, I did not see clear relationships.

#| message: false
#| echo: false
#| fig-cap: "Pairwise scatterplot"
#| label: fig-scatter
fig2

## Linar Regression Results

#| echo: false
#| label: tbl-regression
#| tbl-cap: "Linear regression of six indices on HP"
kableExtra::kable(tbl1)

As @tbl-regression shows, *Speed* and *Defense* have negative effects on *HP*, while *Attack* has positive effect on Pokemon's HP. *Defense* has no significant relationship with *HP*.

## Conclusion

With this project, I achieved a lot of firsts. It was the first time that I worked with such a large dataset. Not only were there 800 observations, but there were also 12 different variables. This meant I had a lot to play around with and explore, but also there was room for a lot of error.

It was also the first time I have worked with multiple linear regression. I am accustomed to performing linear regression analysis on the relationship between two variables, so working with eight was a new challenge.
Update your README.md file to illustrate your purpose and how to use your repo.
As an example:
# ttw13-pokemon
Tidytuesday Project Week 13 - Pokemon
# Introduction
I downloaded the Pokemon. Visualized the data to understanding the relationships among HP and other indices.
# File Structure
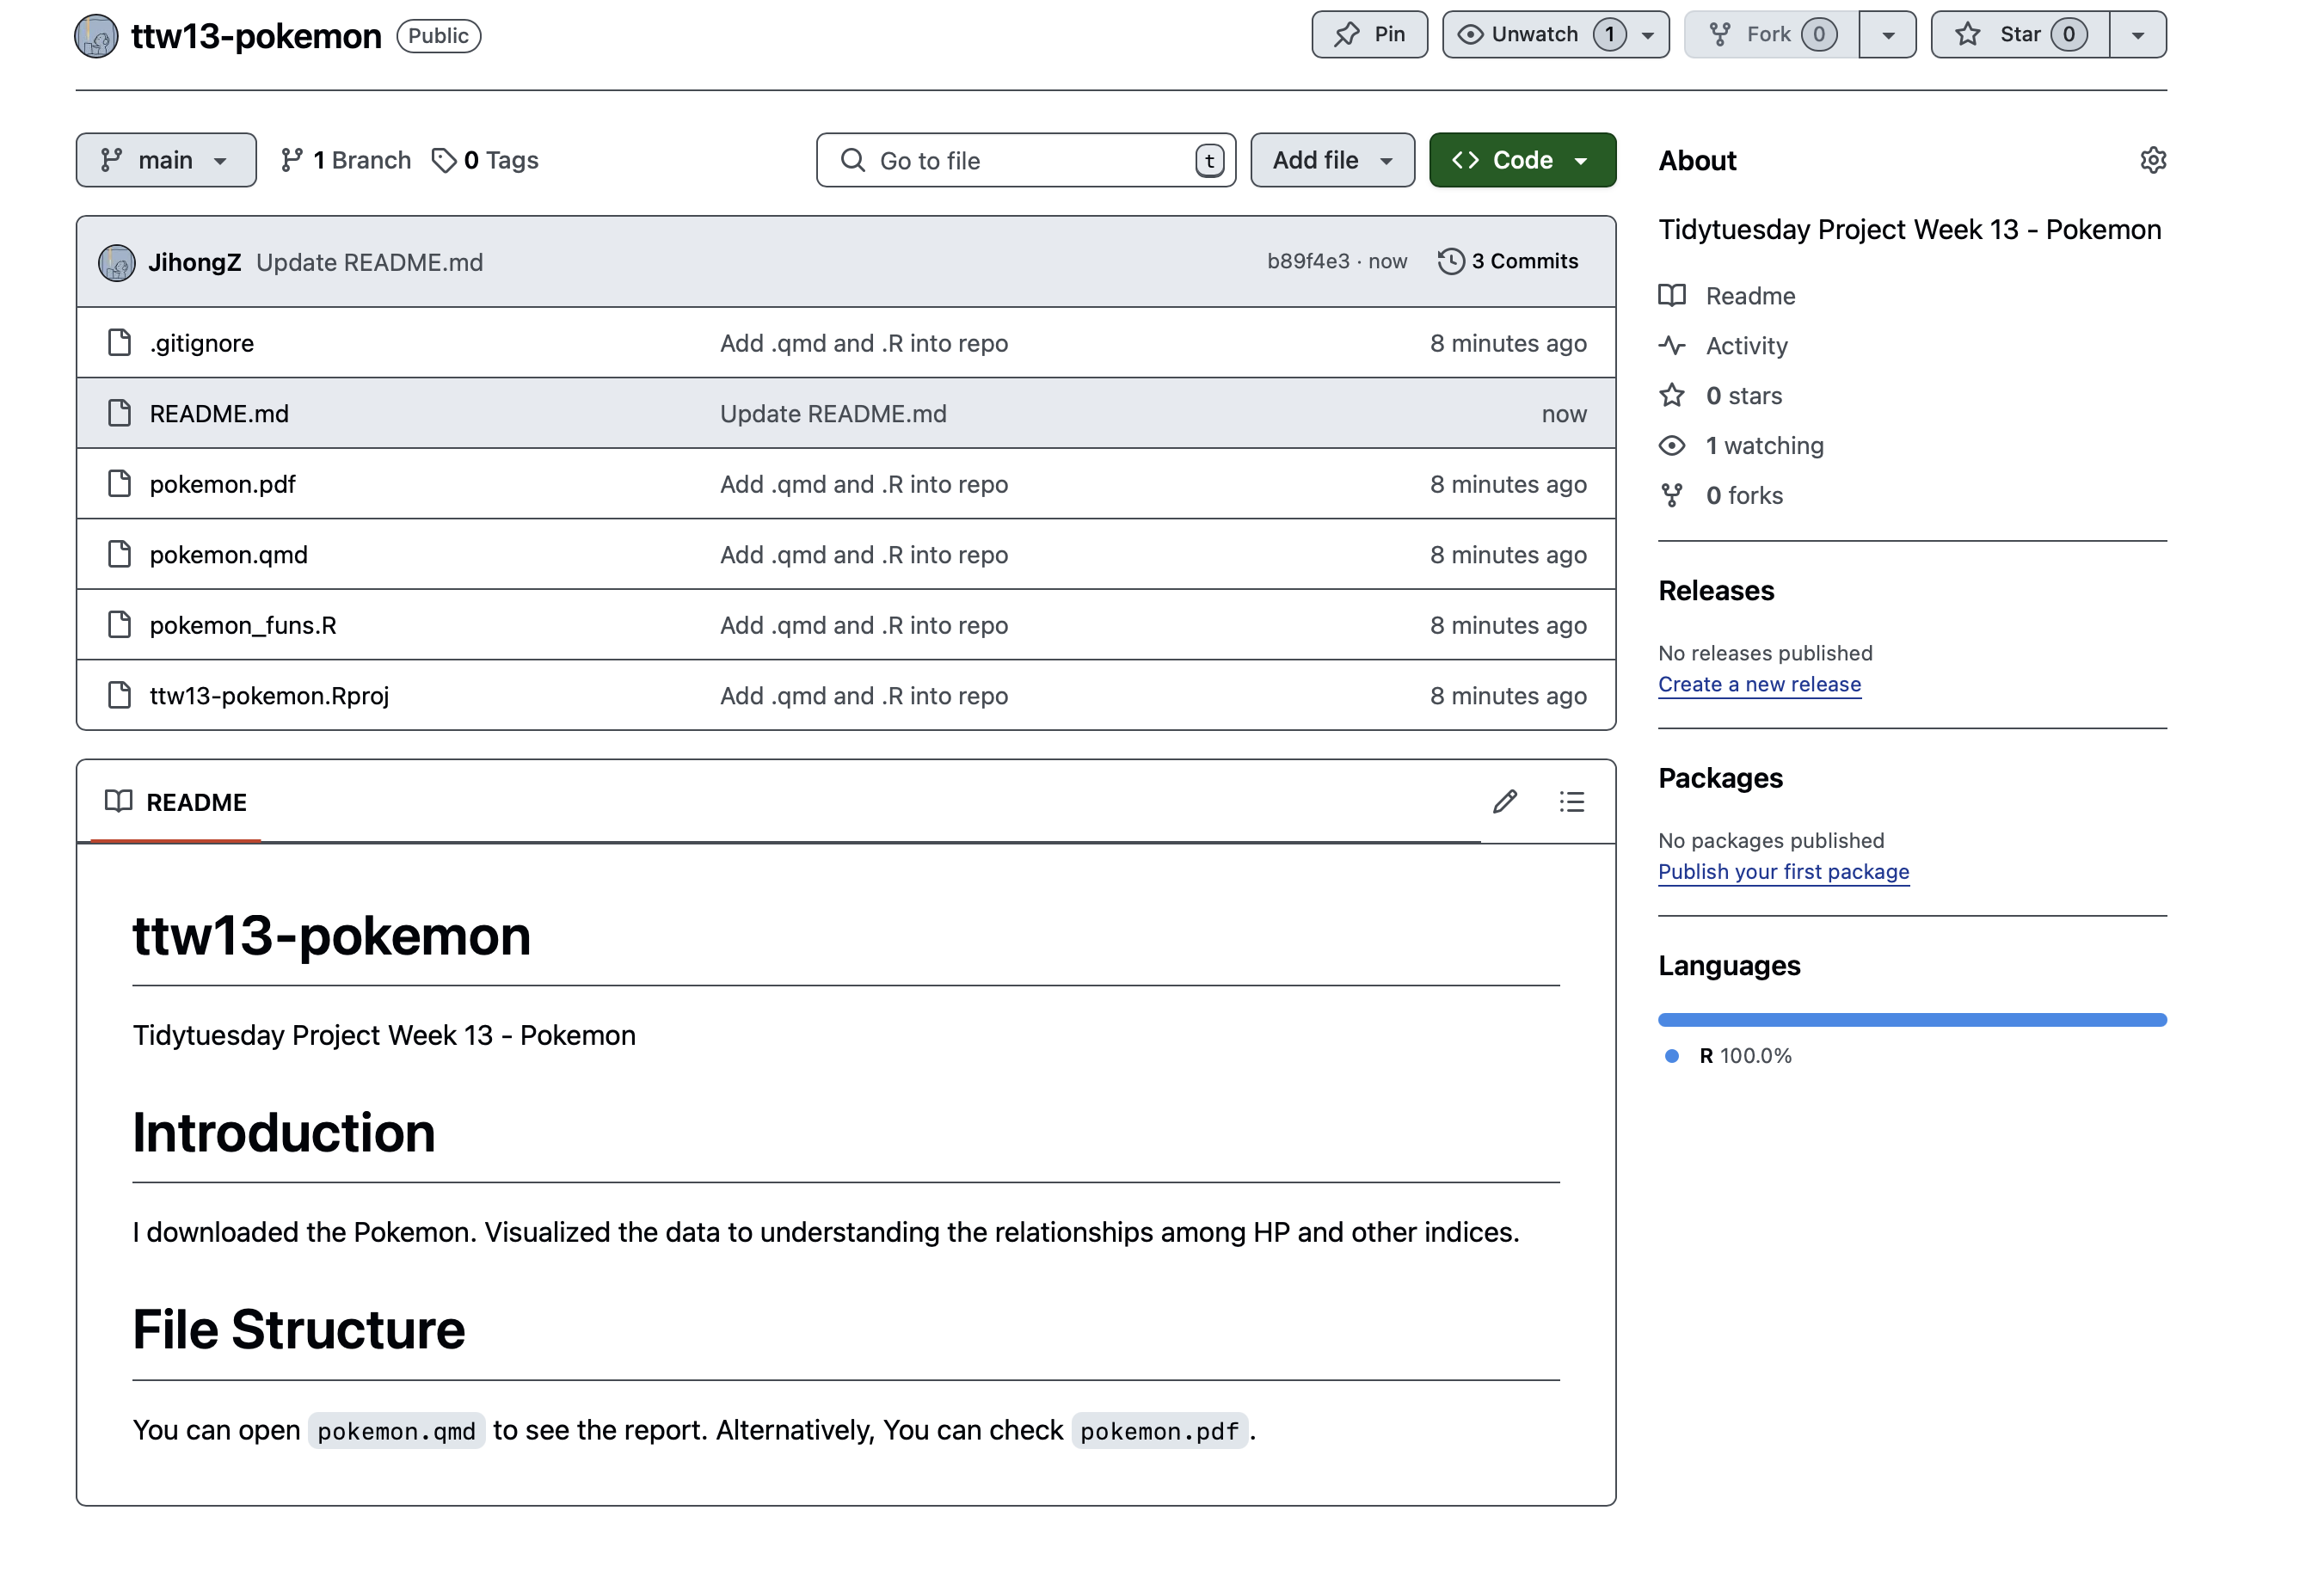
You can open `pokemon.qmd` to see the report. Alternatively, You can check `pokemon.pdf`.Step 5: Push your local changes into GitHub
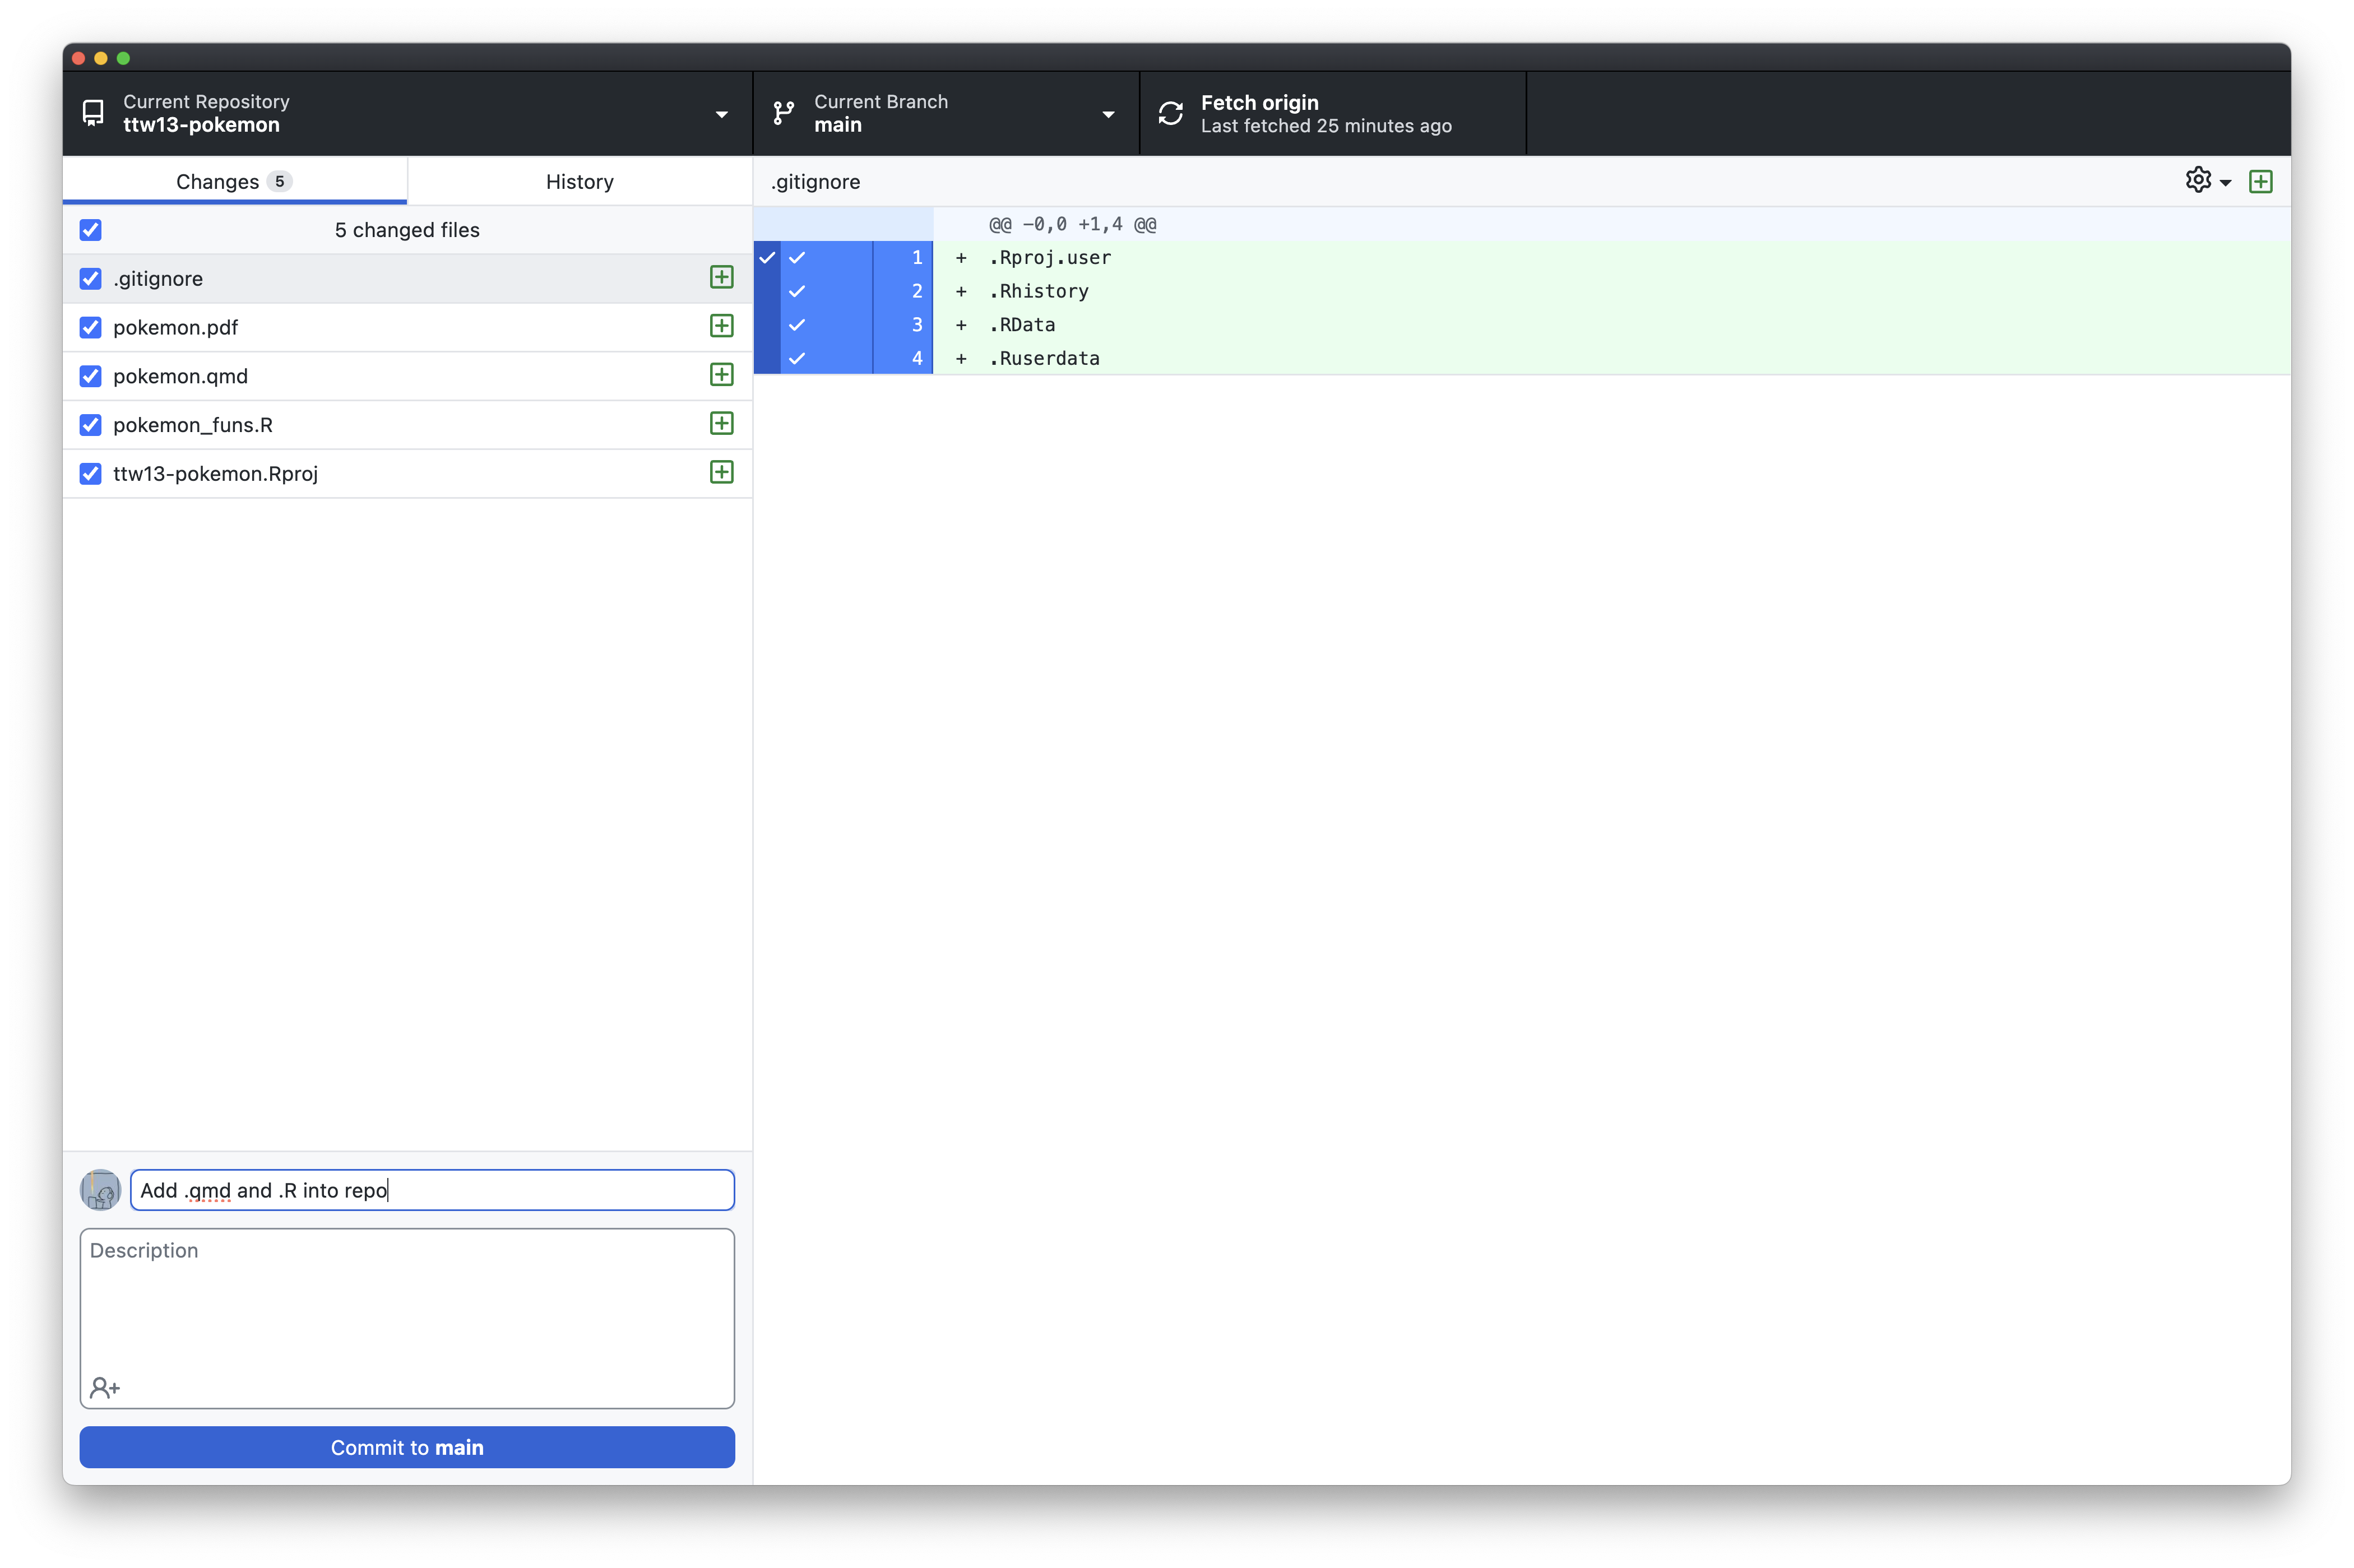
Go back to GitHub Desktop, you will see changes in files.
Add commit messages at the bottom left — “Add .qmd and .R into repo”. Click Commit to main.
Click Push origin to push it to the GitHub
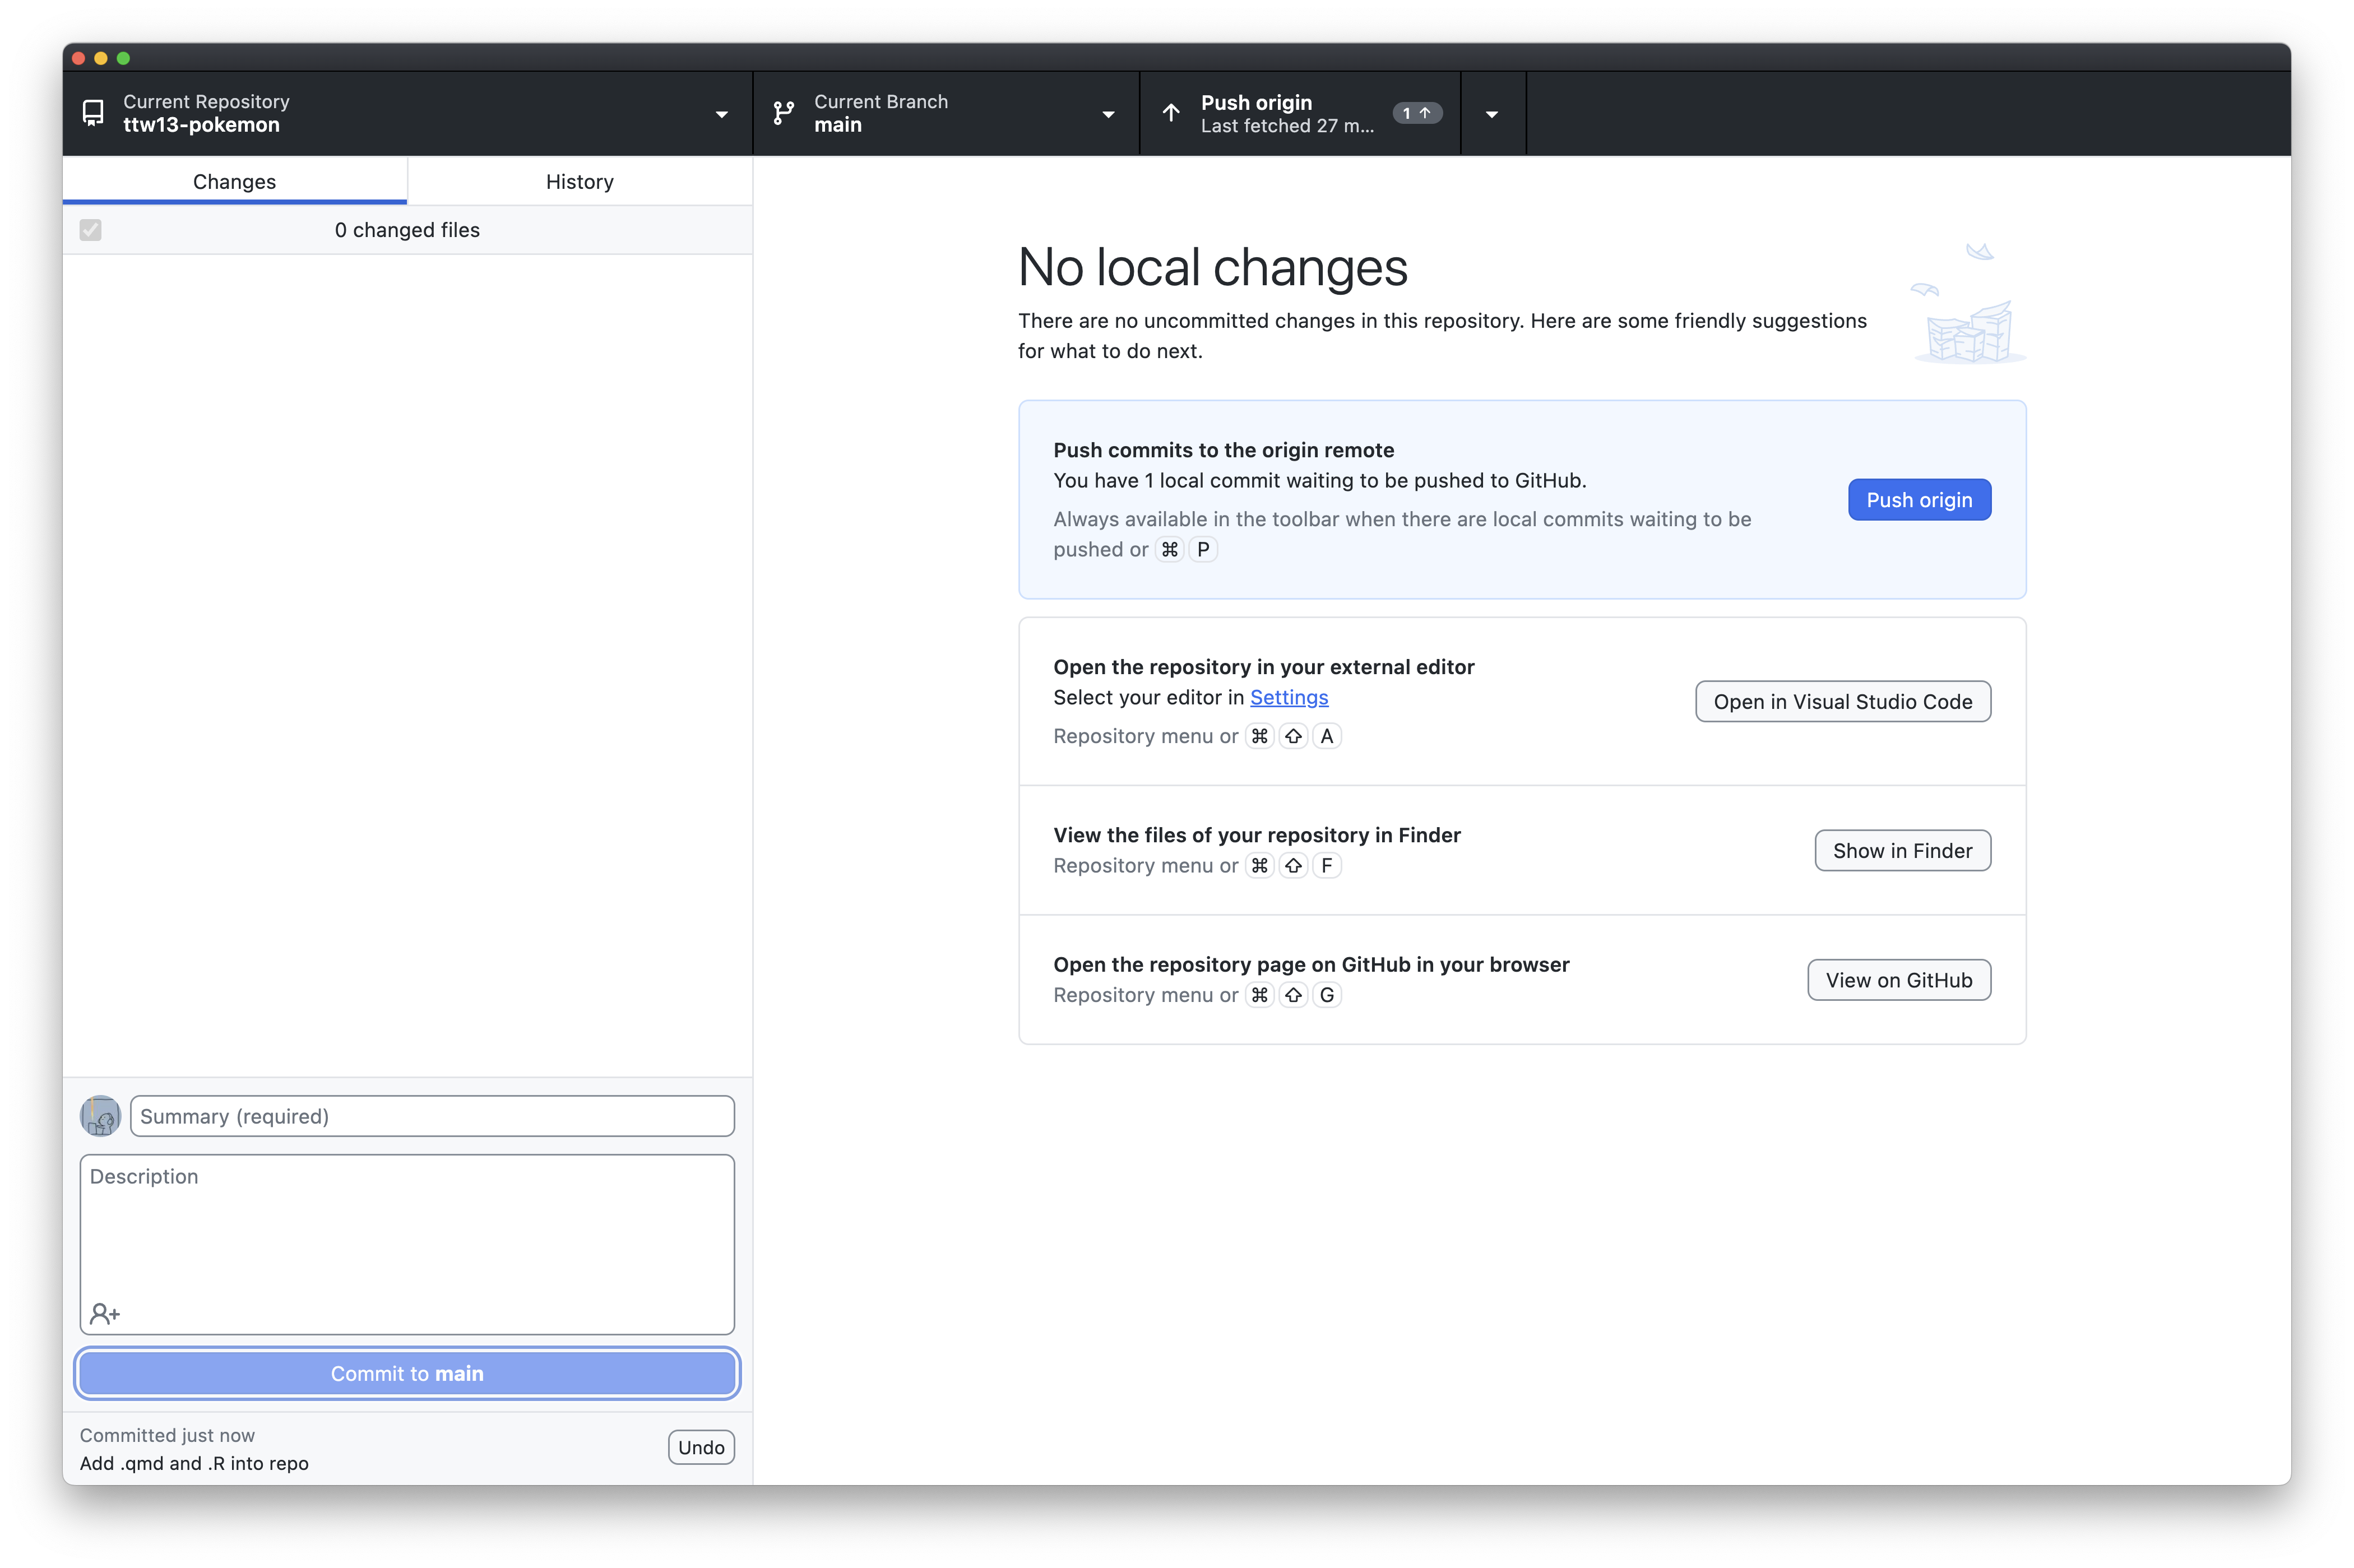
You should see the updated GitHub repo including changed files and documents.
Conclusion
- Git and GitHub are essential tools for version control and collaboration.
- Git manages local changes, while GitHub enables collaboration in the cloud.
- Start using Git and GitHub for better project management and teamwork!
Questions?
Feel free to ask any questions or explore Git and GitHub further!